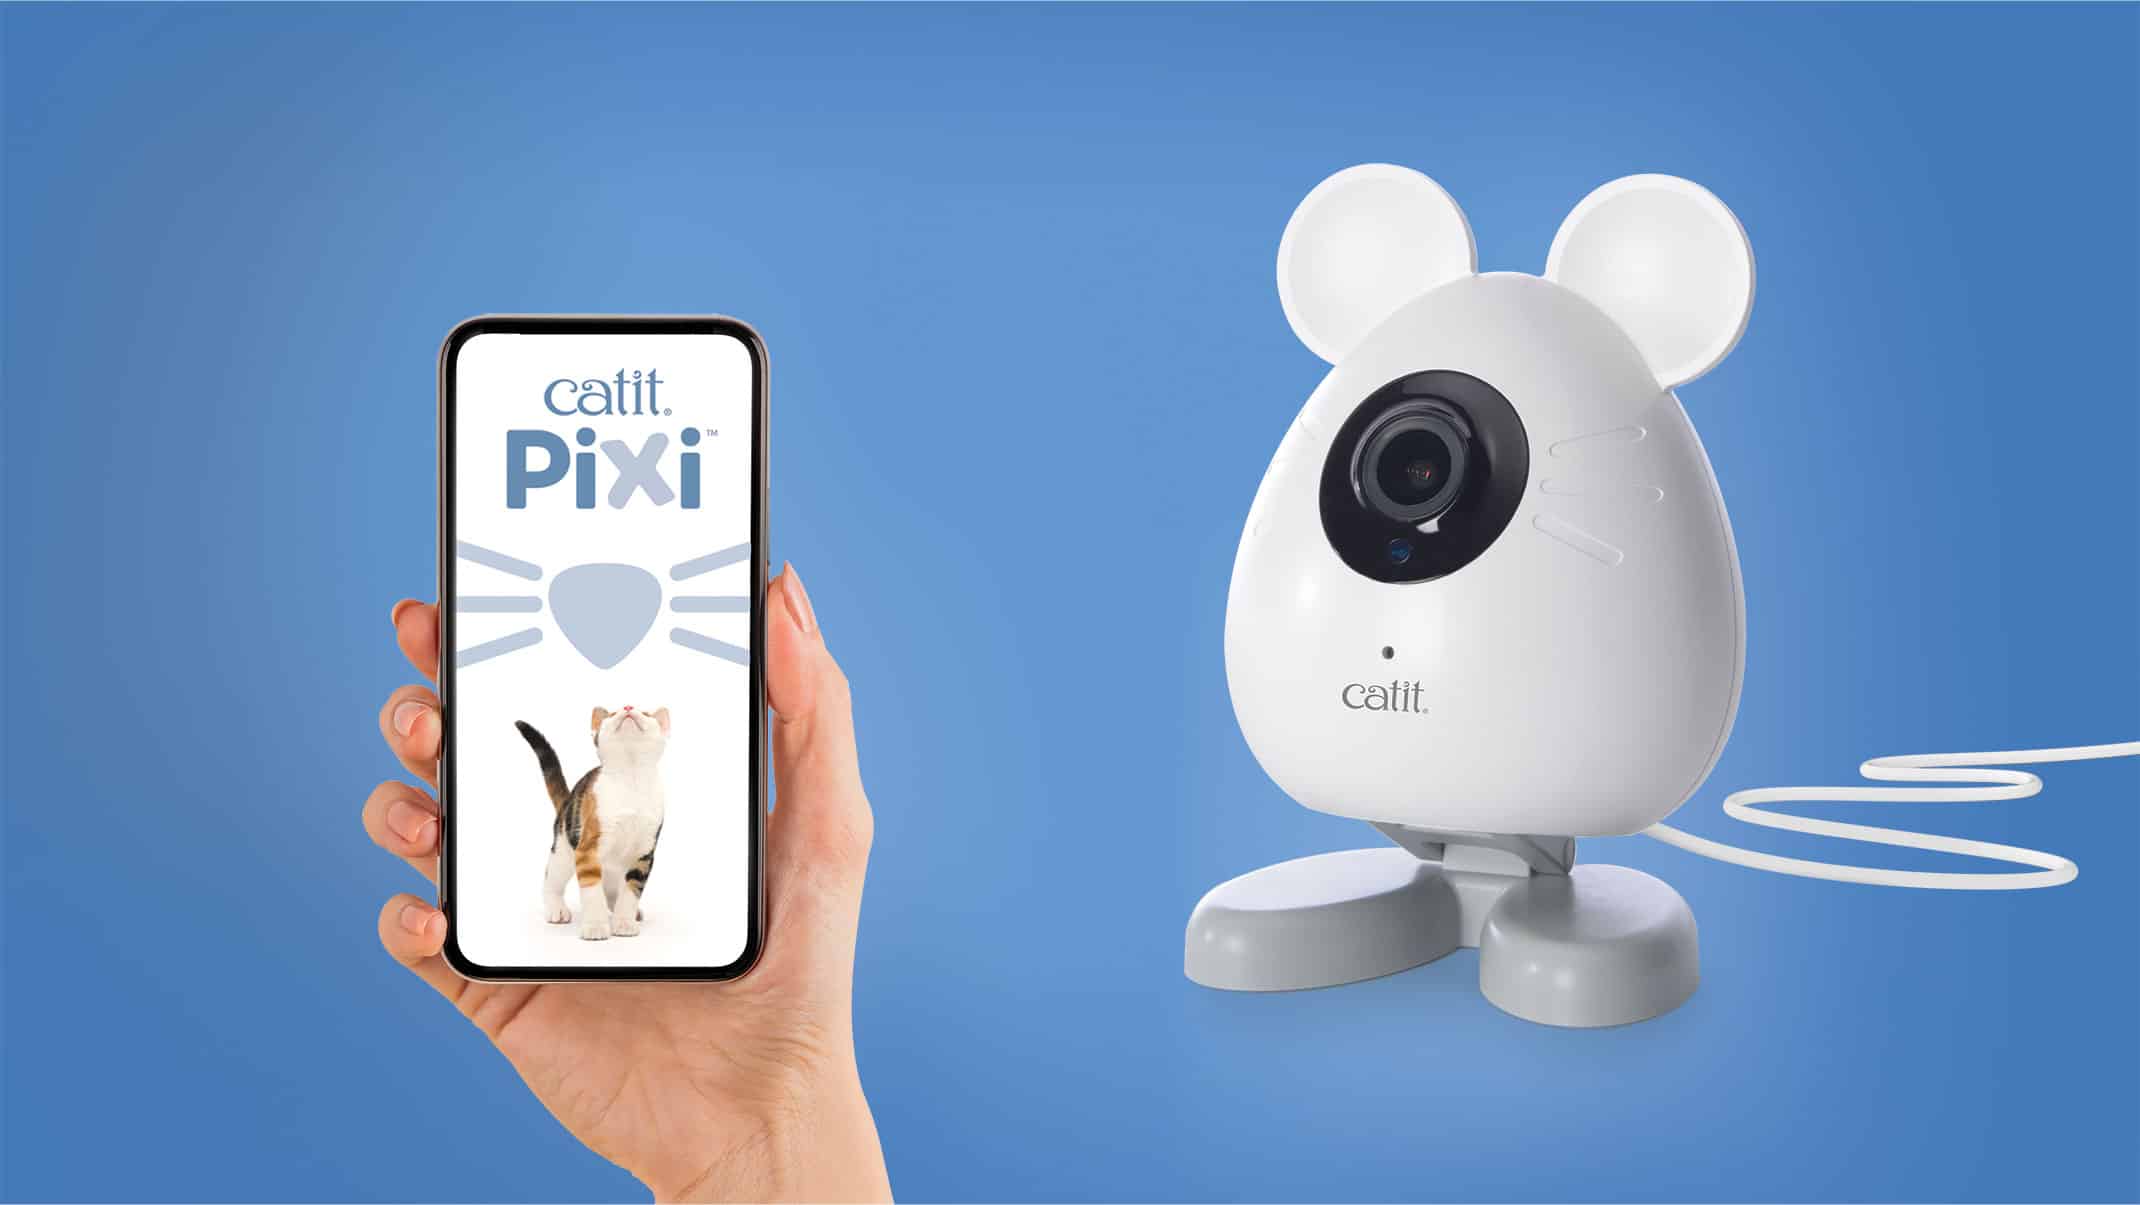
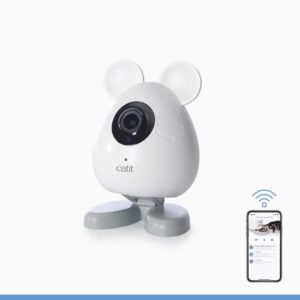
If you have a different kind of question about the Catit PIXI Smart Mouse Camera, visit our dedicated help and advice page.
Please note that you can only access below features after you’ve set up your Catit PIXI Smart Mouse Camera and paired it with the Catit PIXI app as explained in the Quick Start Guide.
Continue reading to learn about each of the app’s features, or use one of the quick-links below to jump ahead:
- 1. Pair camera
- 2. MicroSD card
- 3. Record video
- 4.Talk to your cat
- 5. Take pictures
- 6. My Album
- 7. Connect to other Catit PIXI Smart devices
- 8. Motion detection
- 9. Automatic Recordings
- 10. Overview
- 11. Night vision
- 12. Video Settings
- 13. Q&A
1. Pair camera
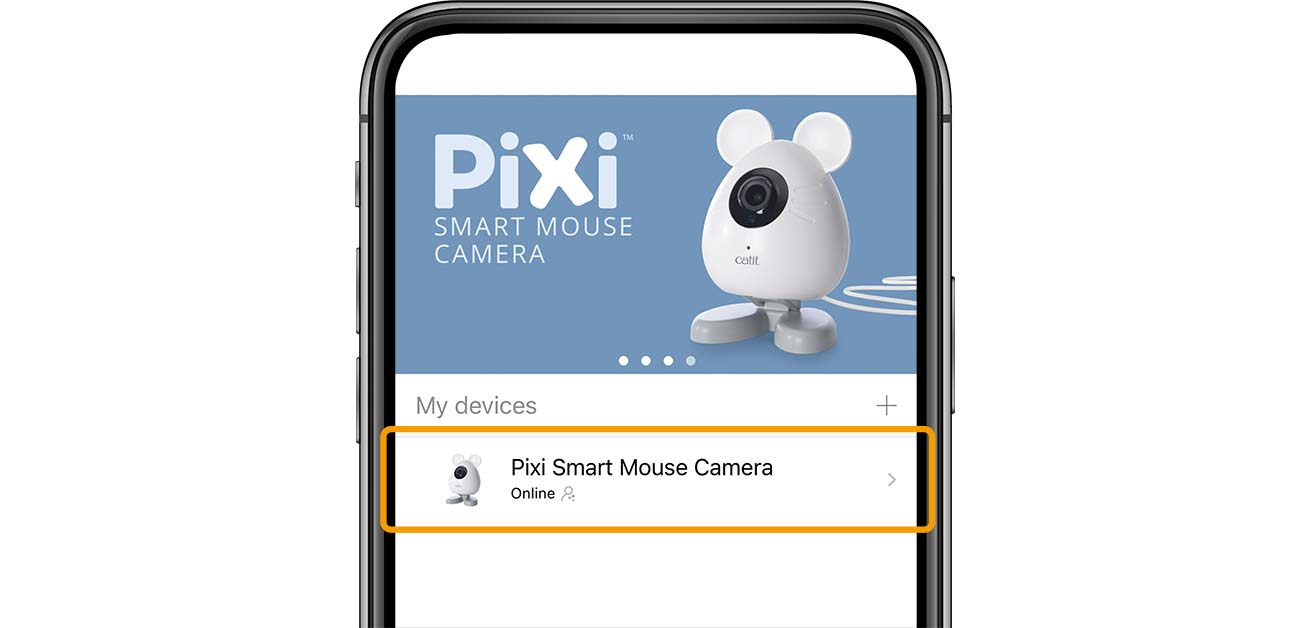
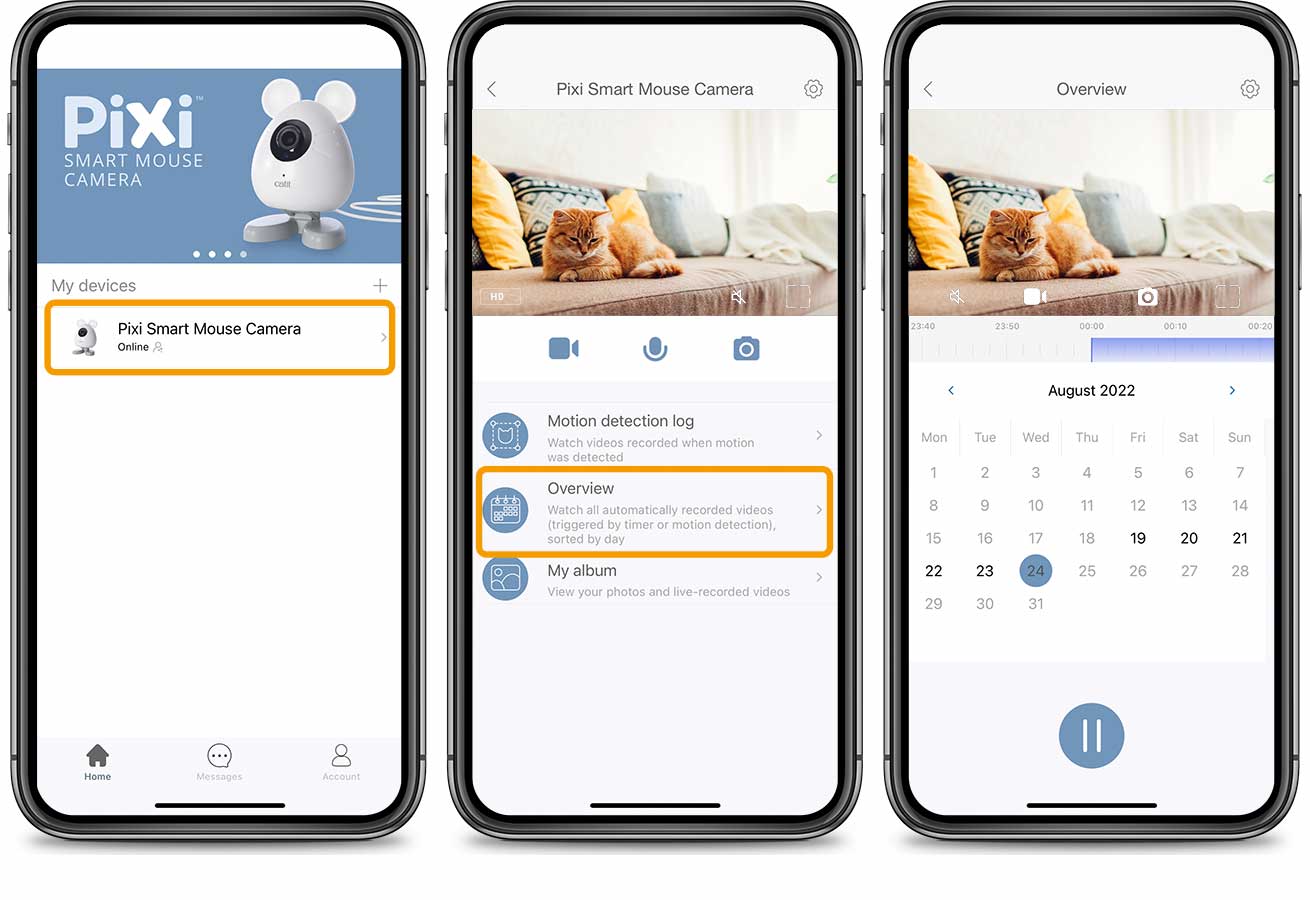
Select the Catit PIXI Smart Mouse Camera on your app’s home menu to access its features. If you don’t see the Smart Mouse Camera listed in your app, you’ll need to pair the device with your app to proceed.
It’s possible to add multiple cameras to the Catit PIXI app, for you to control and manage individually.
2. MicroSD card
While a microSD card is not required to use the camera’s live features (watching, talking and recording in real time), inserting such a card is required to use the camera for automatic recordings.
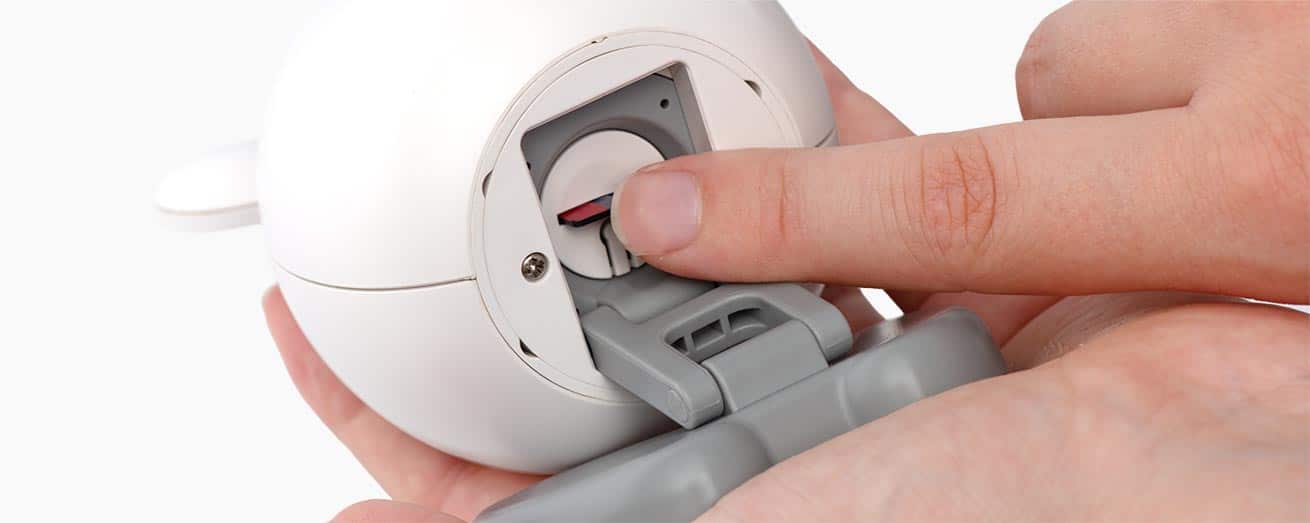
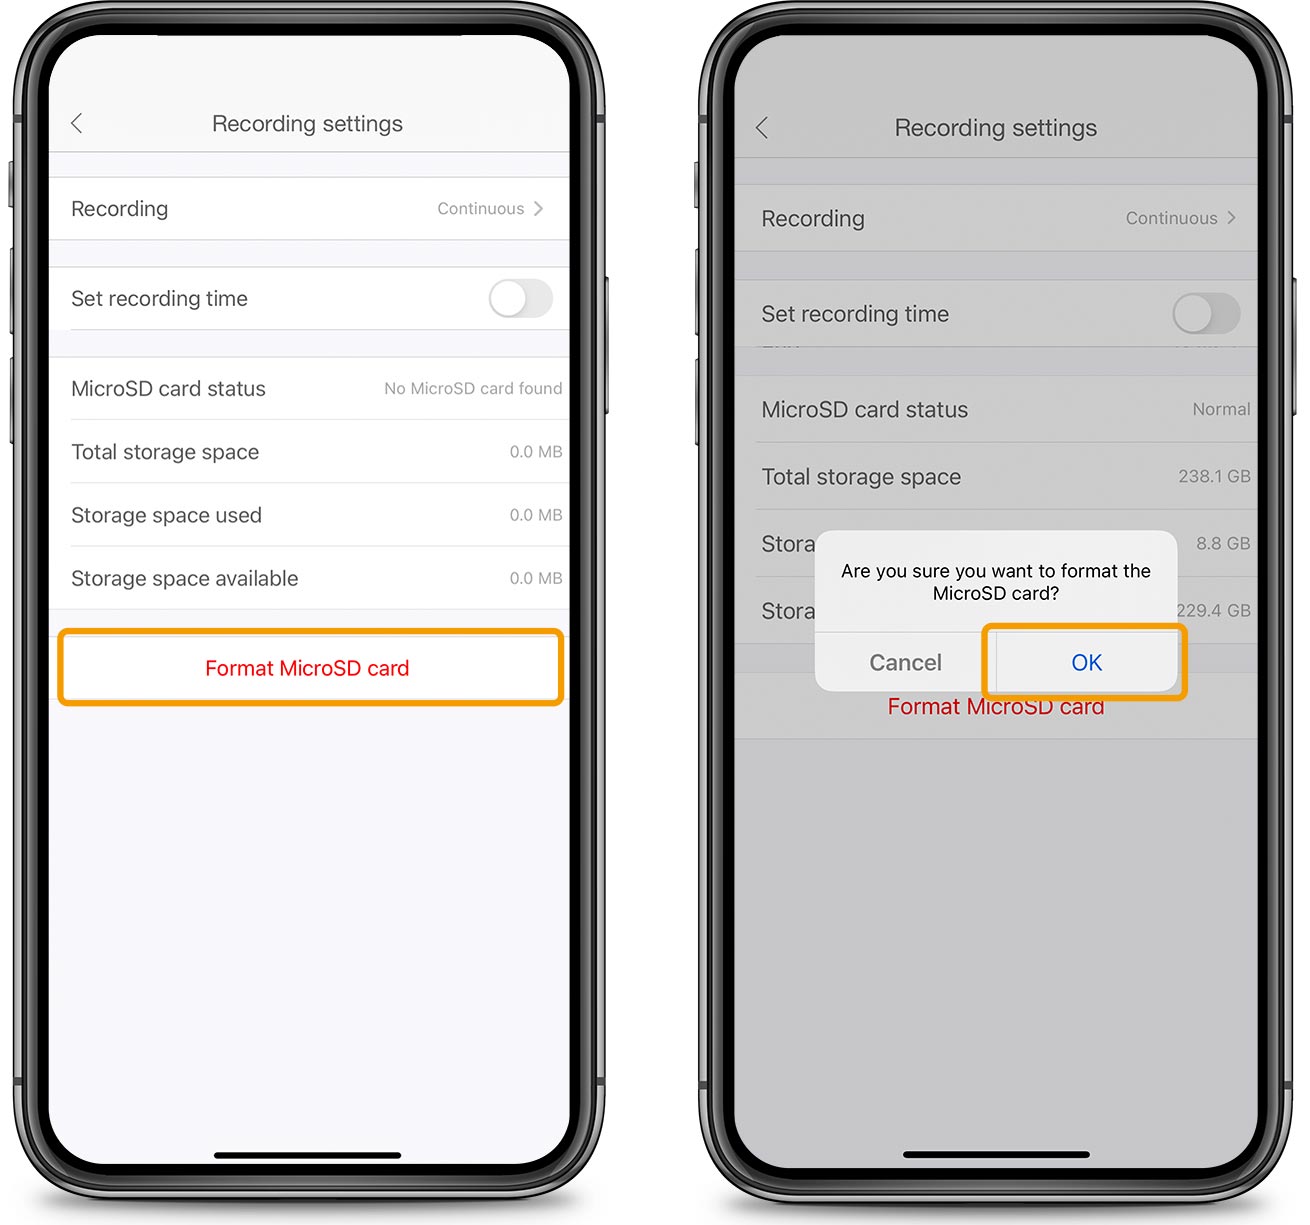
Insert a MicroSD card with a max. storage capacity of 256 GB into the slot at the bottom of the Catit PIXI Smart Mouse Camera. After insertion, open the recording settings in the app to check if the card is working normally. It should say ‘MicroSD card status – normal’.
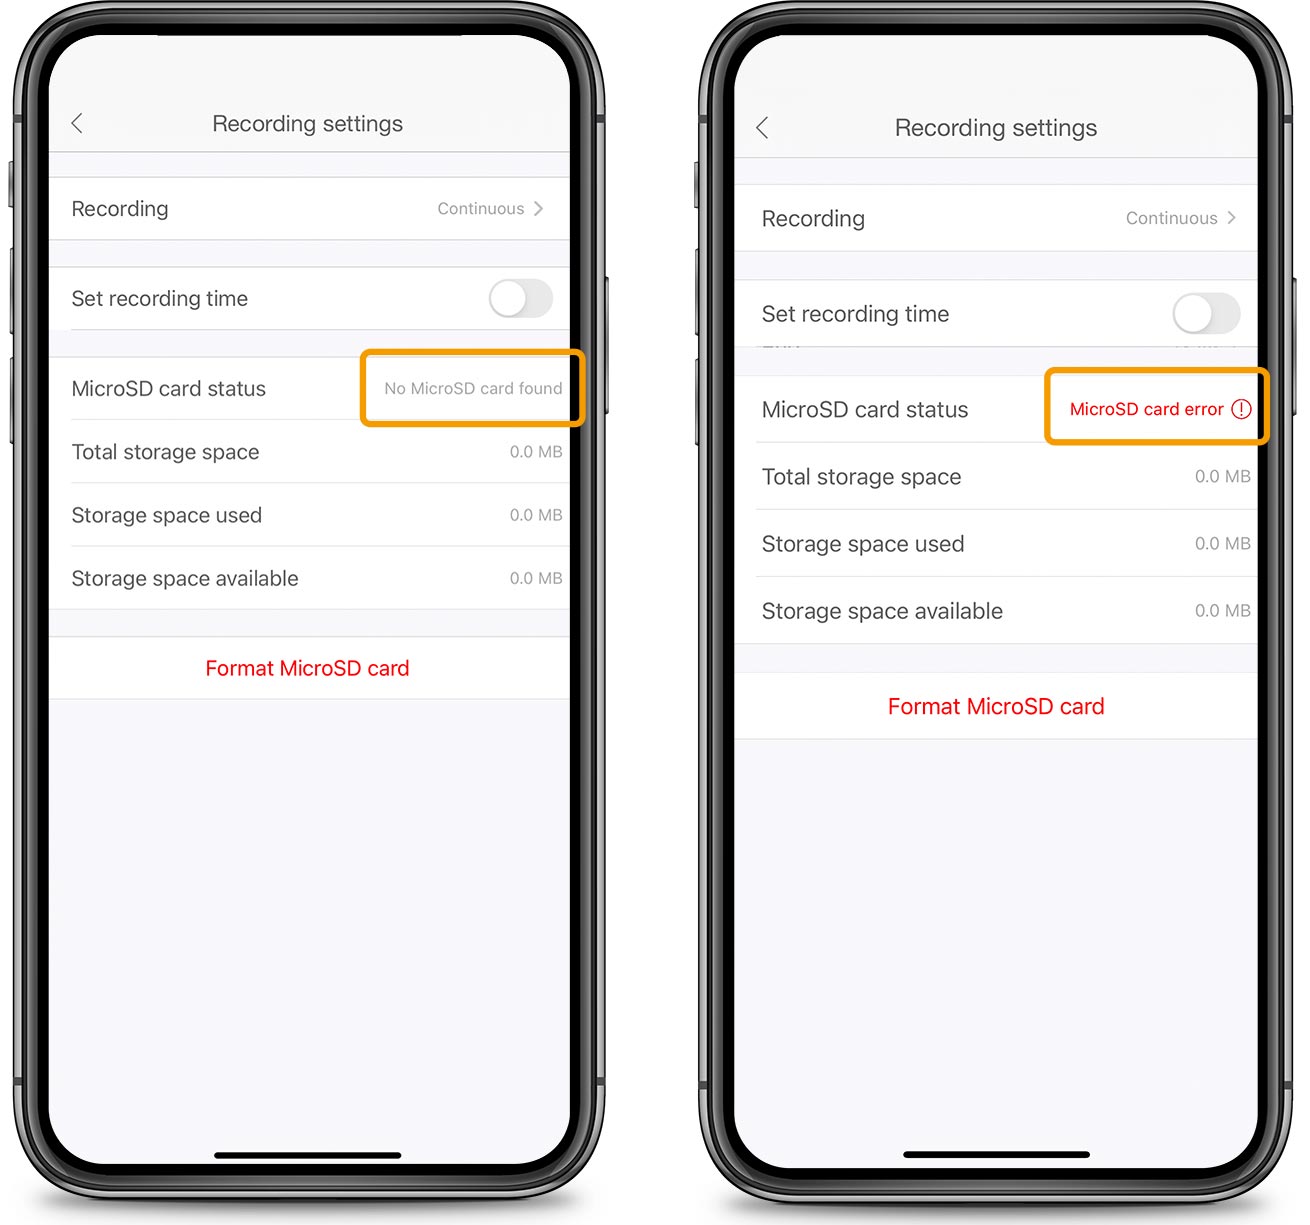
If the MicroSD card is not found, or displays an error, tap on ‘Format MicroSD card’ at the bottom of the recording settings screen. Formatting may remove all data from the SD card, so ensure the card is empty or does not have important data on it before proceeding.
The ‘Recording Settings’ menu also displays how much space is left on your MicroSD card out of the total storage space.
3. Record video
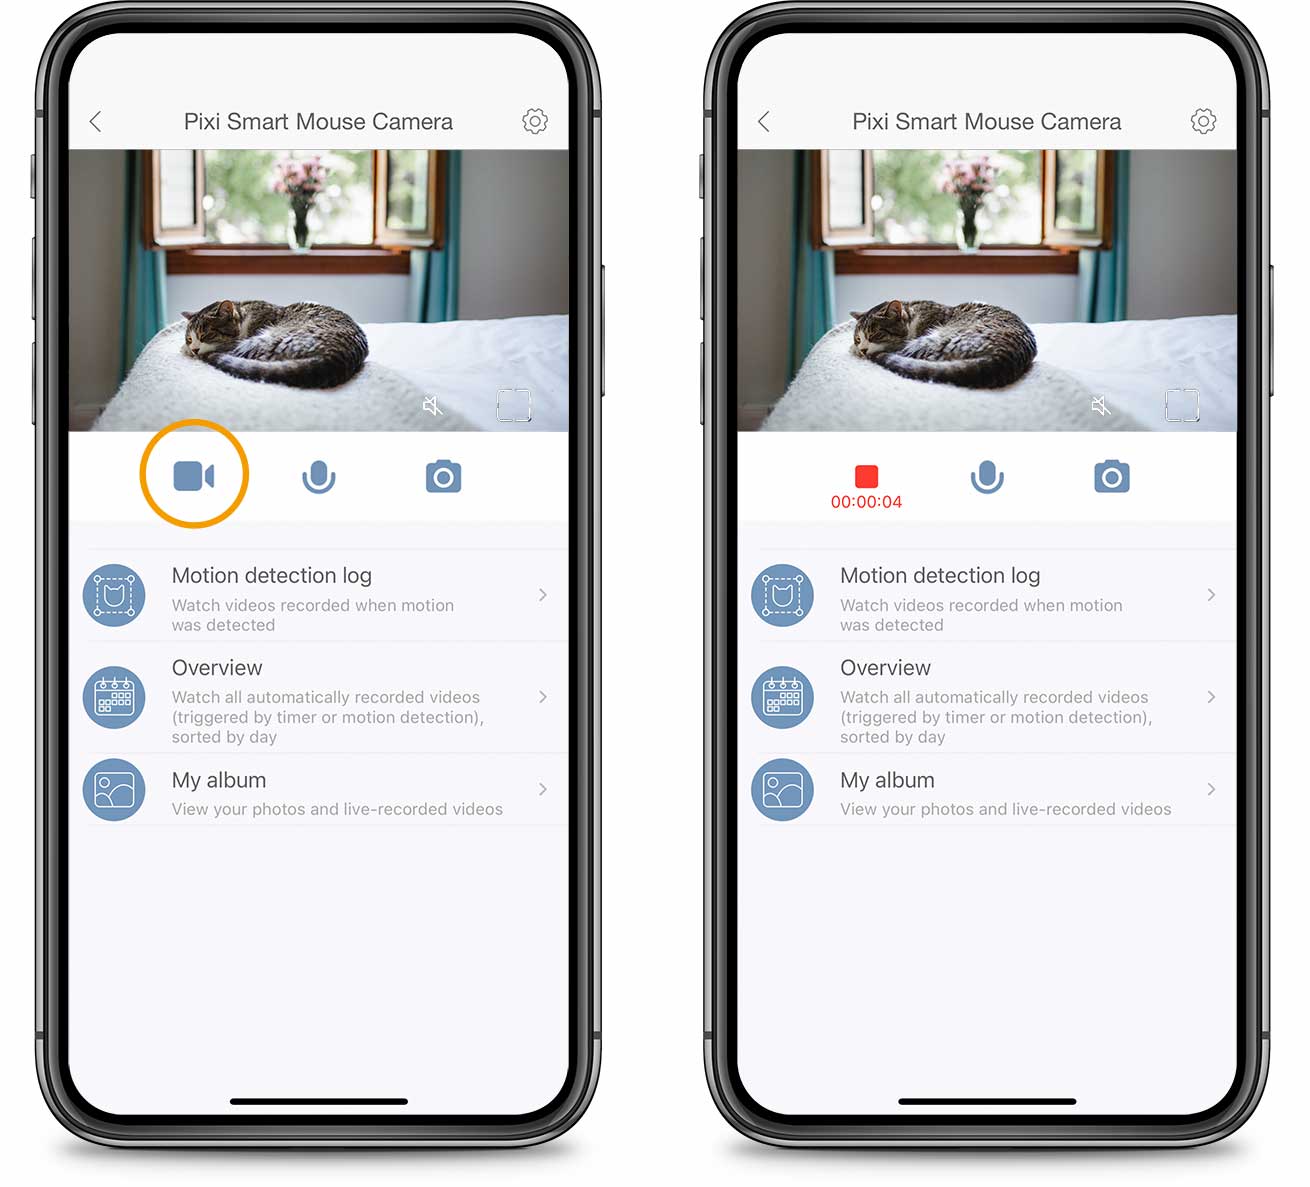
Tap the record icon below the live video feed in the Catit PIXI app to start recording video instantly. If successful, a timer will start to indicate the length of your current recording. Tap the red square to stop recording. The recorded video will be saved to ‘My Album’ and your smartphone’s camera roll.
For information on automatic recordings, skip ahead.
4. Talk to your cat
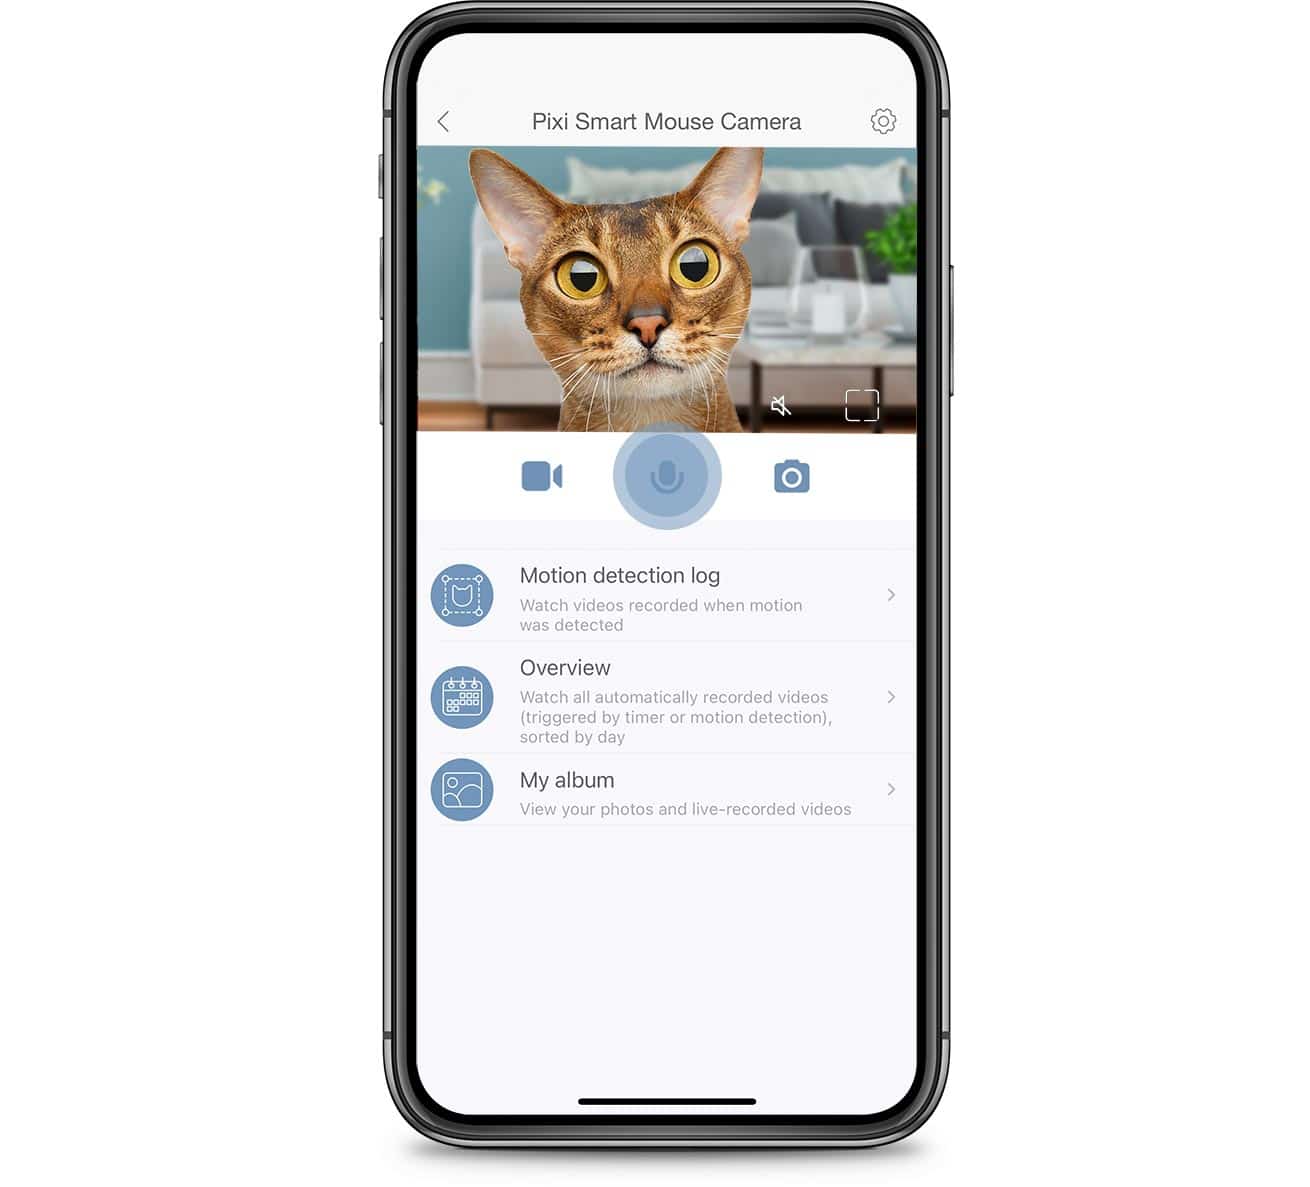
Press and hold the microphone icon below the app’s video feed to talk to your cat in real time.
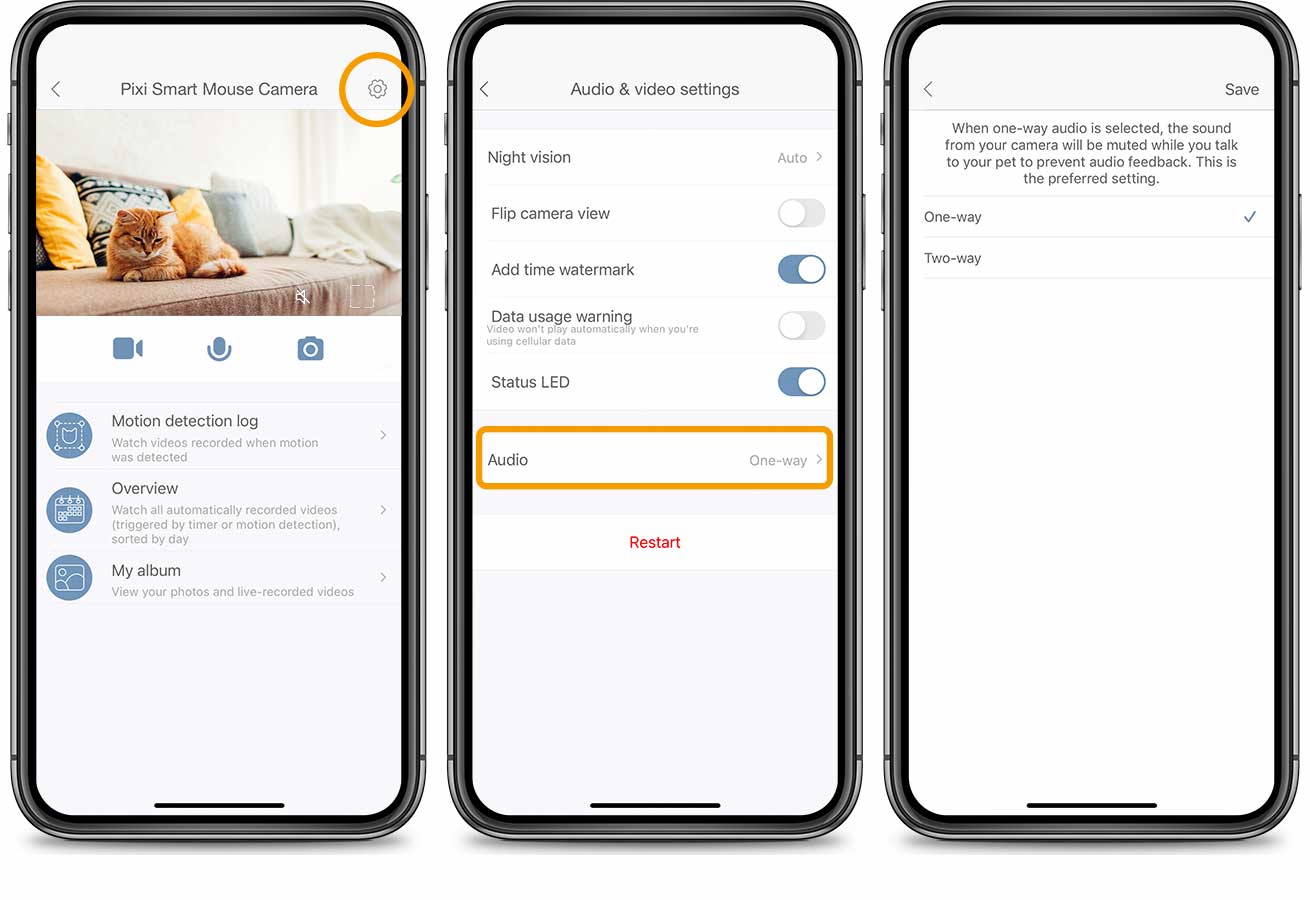
When using this feature, you may wish to switch to one-way audio in the ‘Audio & Video settings’, as it prevents audio feedback from the camera while you talk.
5. Take pictures
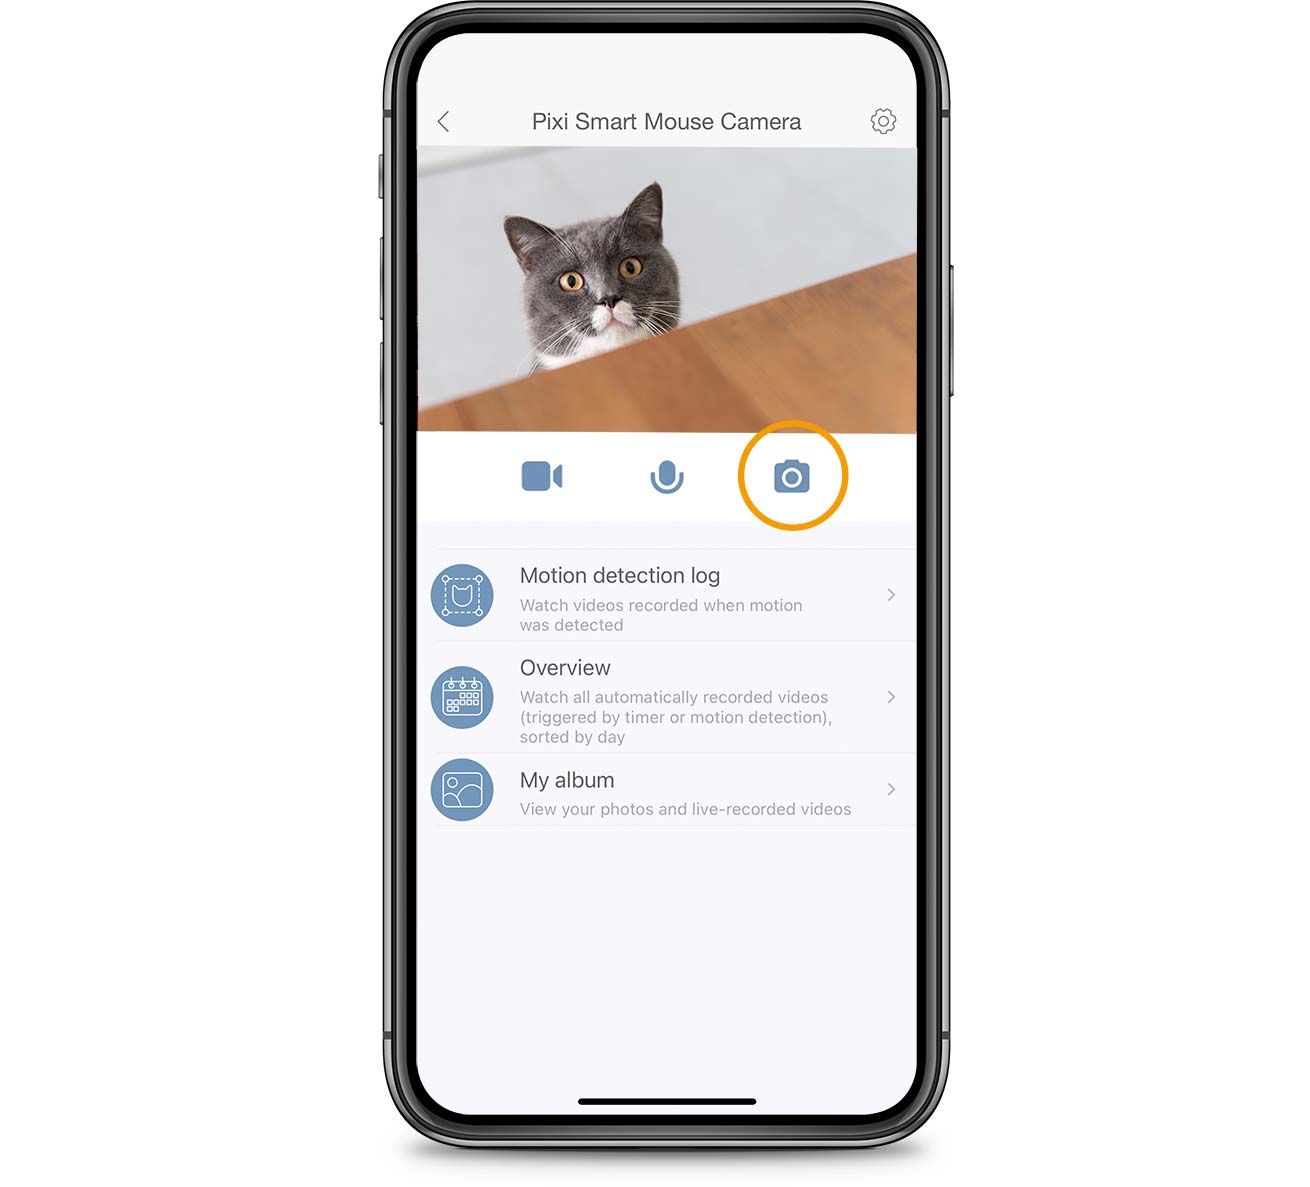
To take a photo, press the camera button located at the right below the video feed in the Catit PIXI app. All photos you take are sent to ‘My Album’ and to your smartphone’s camera roll.
6. My Album
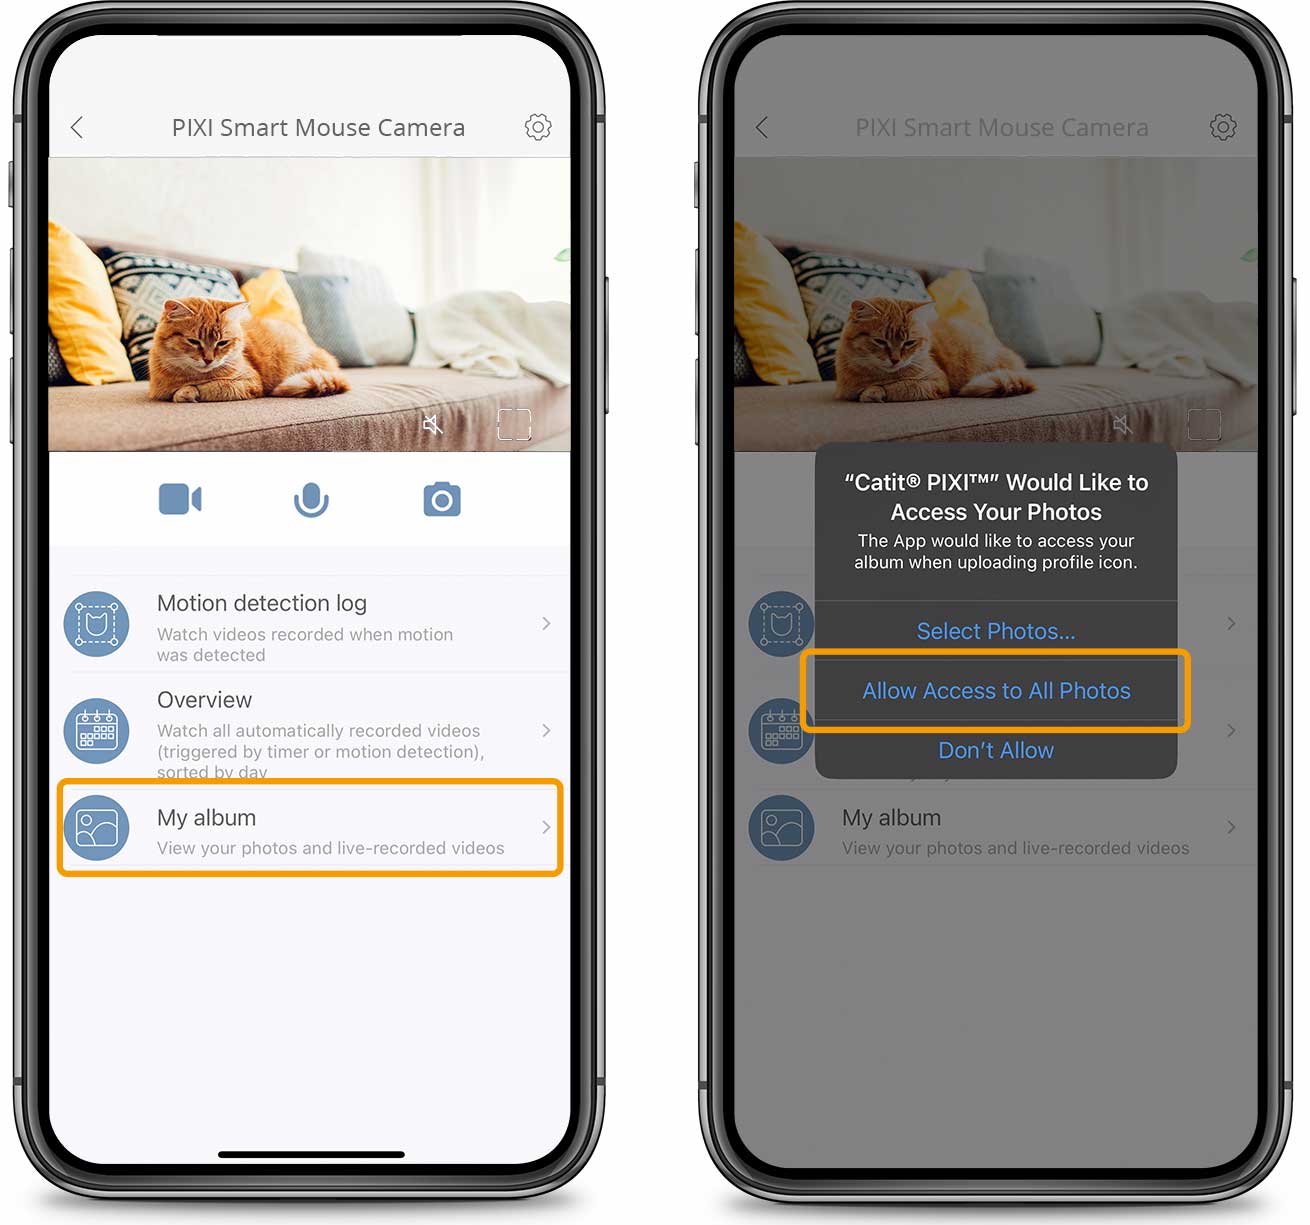
The feature called My Album is exactly what you’d expect; a digital album in which photos and videos you’ve created (in real time) are stored for your viewing pleasure. To use the album, you need to grant the Catit PIXI app access to your smartphone’s photo library, as the two are linked. Take note that deleting a picture or video from My Album will also delete it from your smartphone’s camera roll, and the other way around.
Skip to Overview to find out where automatic recordings are stored.
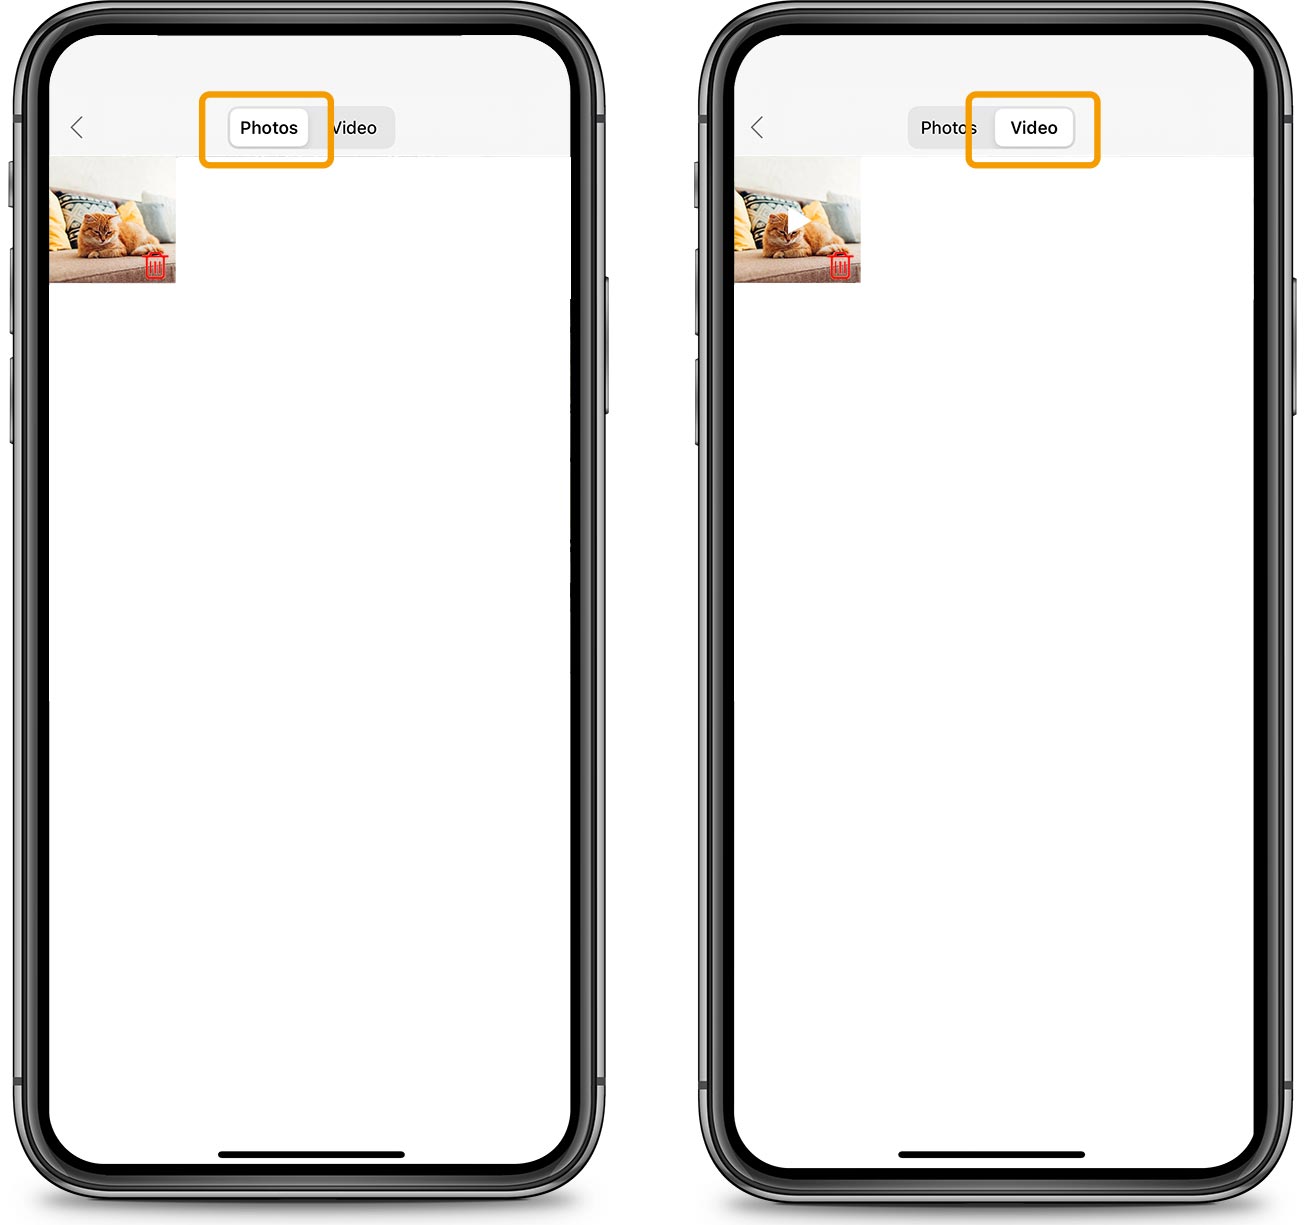
Select either ‘Photos’ or ‘Video’ at the top of the screen to switch galleries. Tap on a photo or video to watch a bigger version of it.
7. Connect to other Catit PIXI Smart devices
If you own any other Catit PIXI Smart devices, you can connect them to your Catit PIXI Smart Mouse Camera in the app. This will merge the camera’s live features to their individual app interfaces, so you can for example, keep watching your cat as you dispense food, and even tell them their meal is served, without leaving the PIXI Smart Feeder app menu.
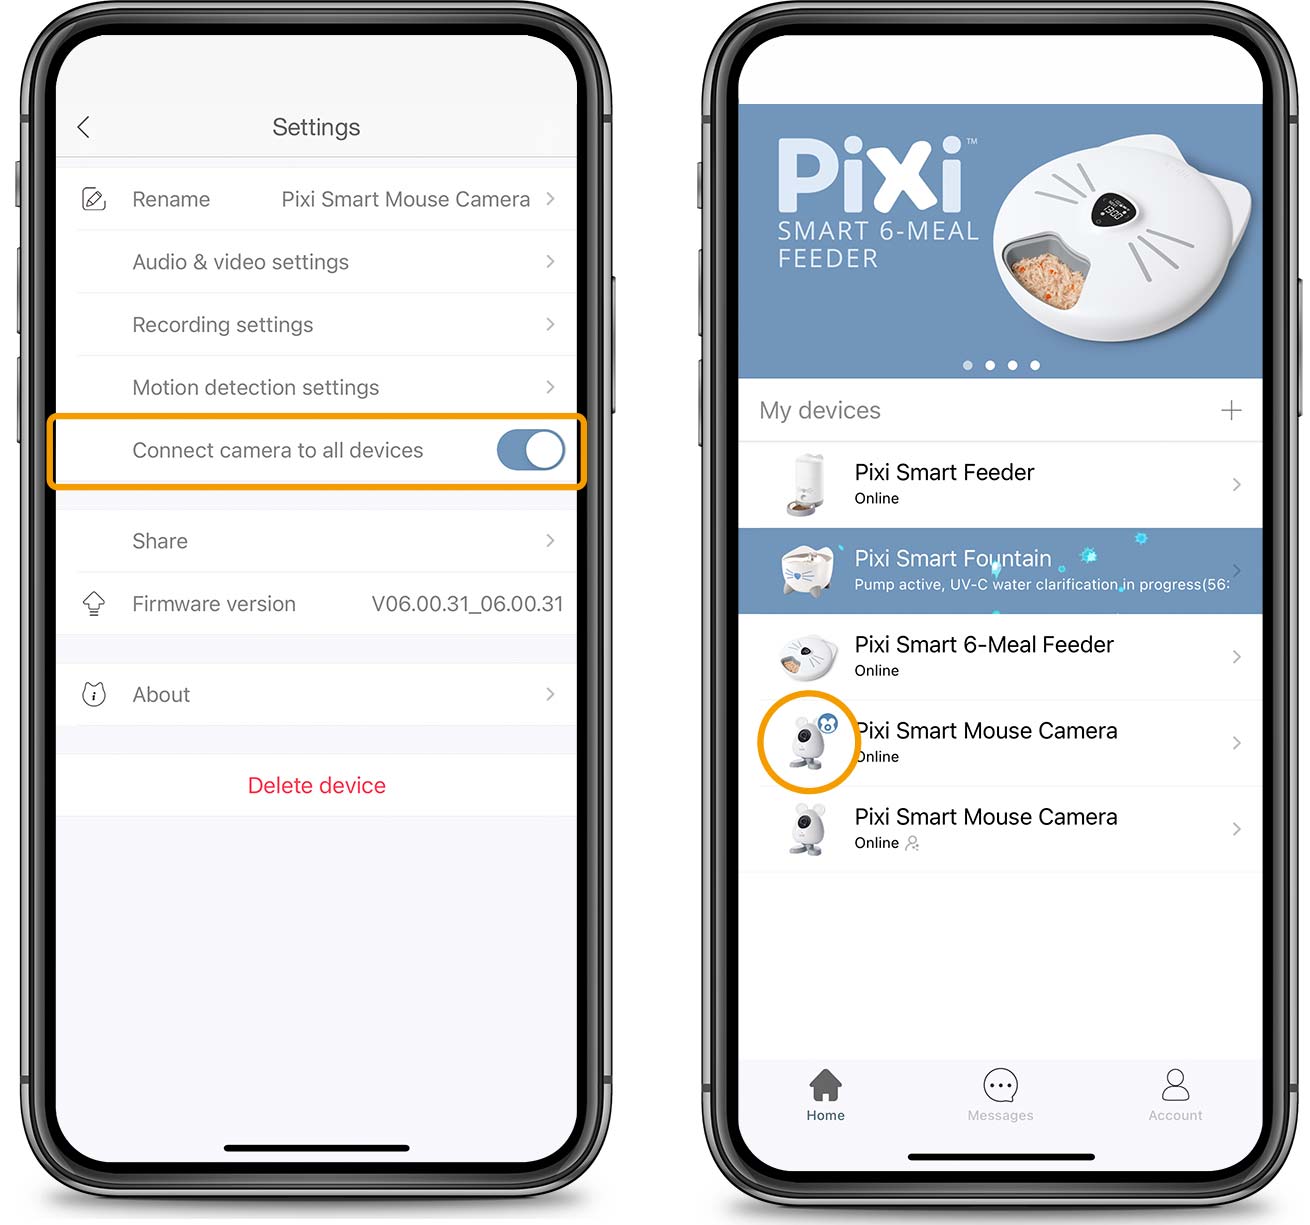
To connect your Catit PIXI Smart Mouse Camera, open the Settings menu and select ‘Connect camera to all devices’. If successful, a small icon will appear right next to the PIXI Smart Mouse Camera in your app’s home menu.
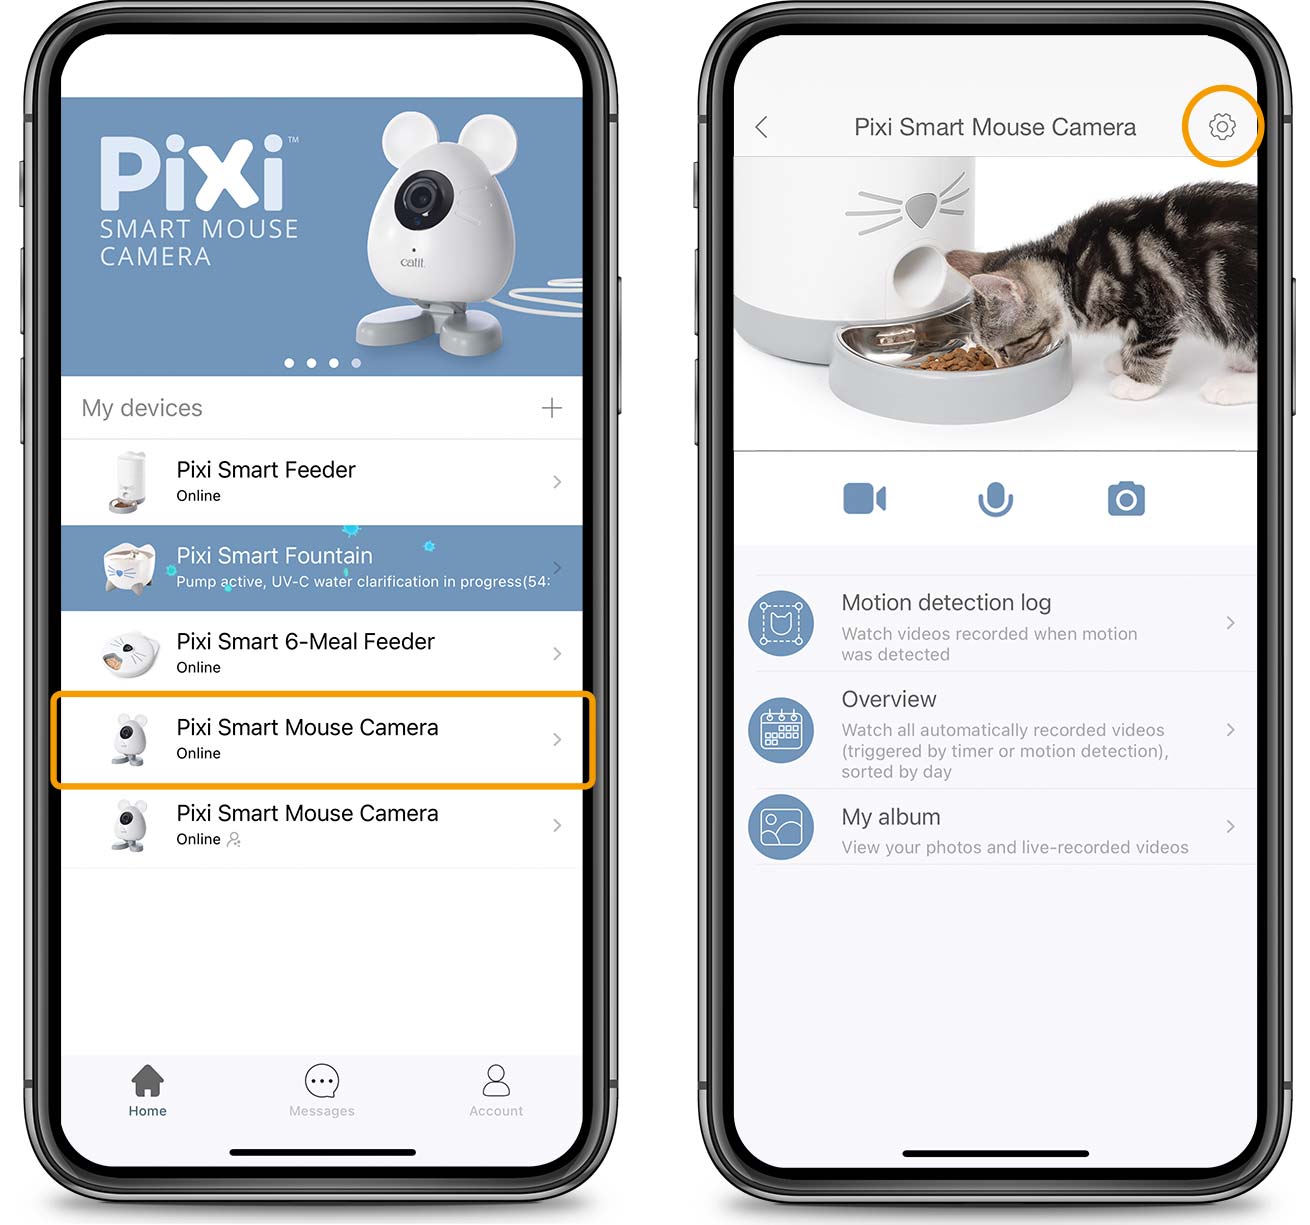
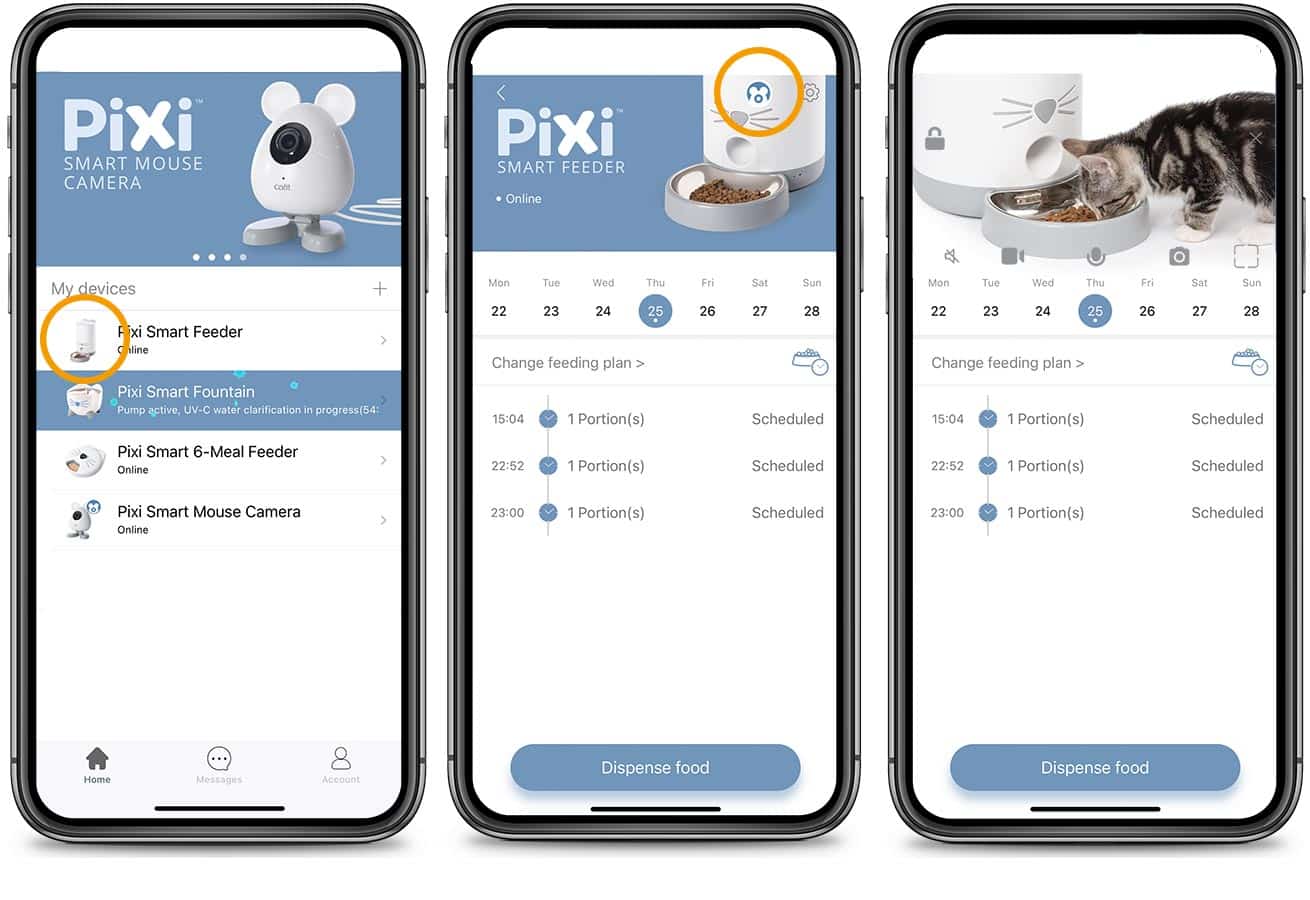
Next, select your other Catit PIXI Smart device in the app’s home menu. You’ll find the same icon at the top right of the screen. Tap it to initiate the camera’s live video and interactive features within that screen.
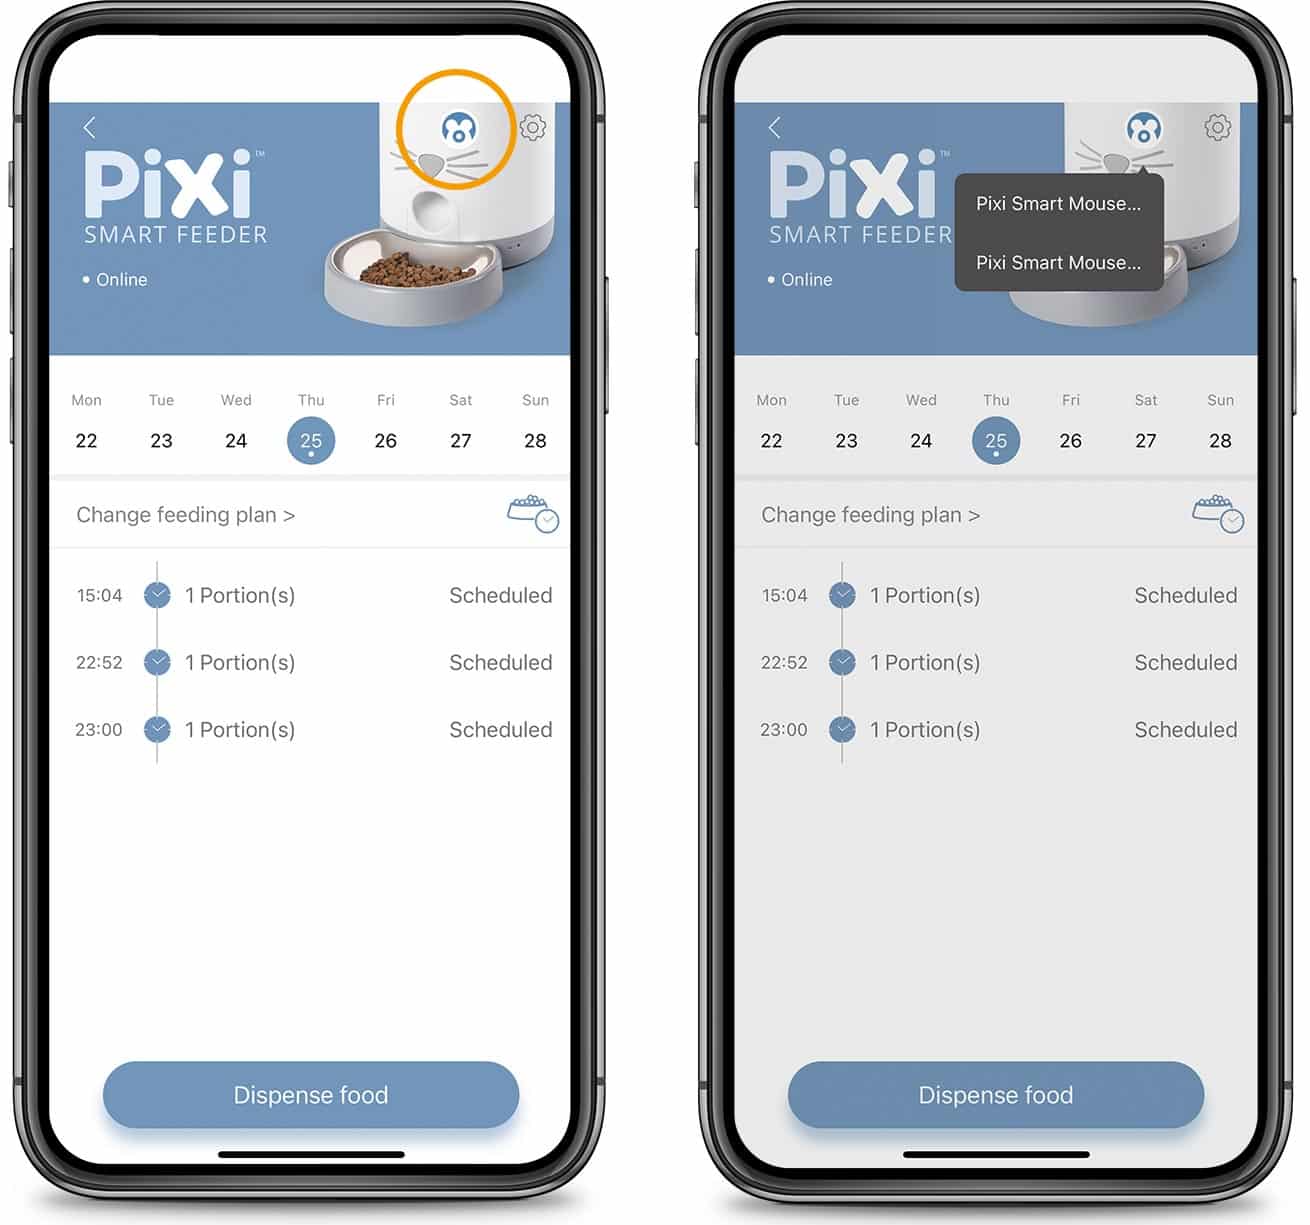
If you own multiple Catit PIXI Smart Mouse Cameras (and have enabled sharing for two or more of them), tapping the camera wil presents a drop down list from which to select the camera you want to connect.
8. Motion detection
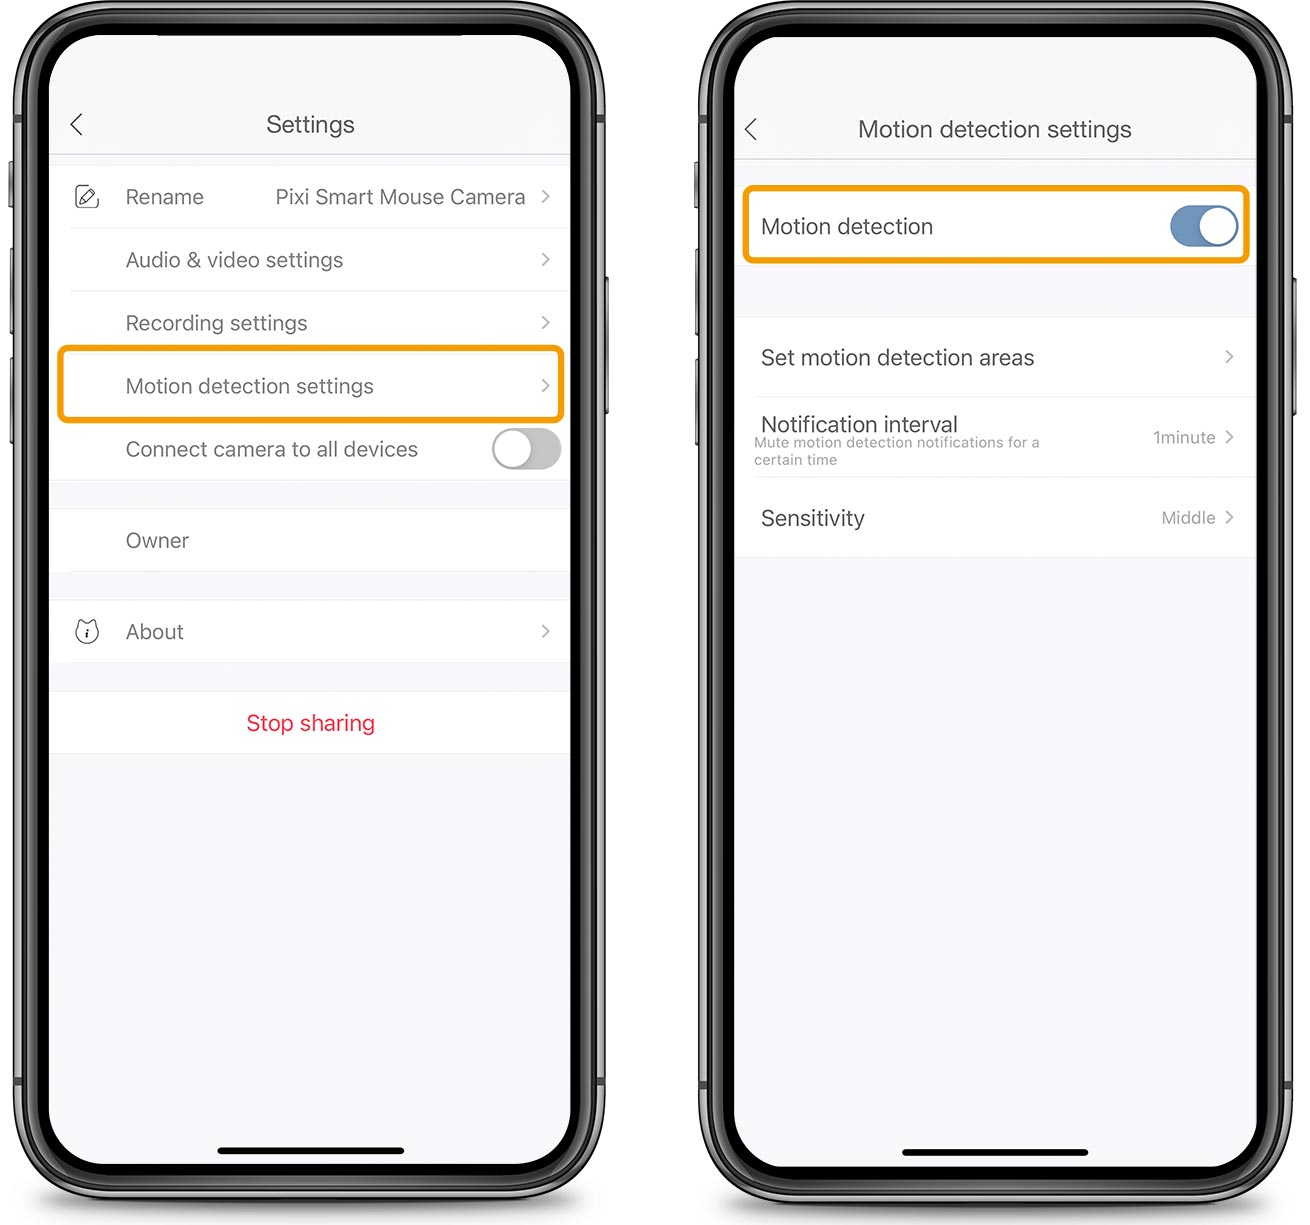
With motion detection enabled, you will receive a notification on your smartphone as soon as movement is picked up on by the Catit PIXI Smart Mouse Camera. The notification allows you to check the live video feed in the app at the right moment, and to manually take photos or to start recording.
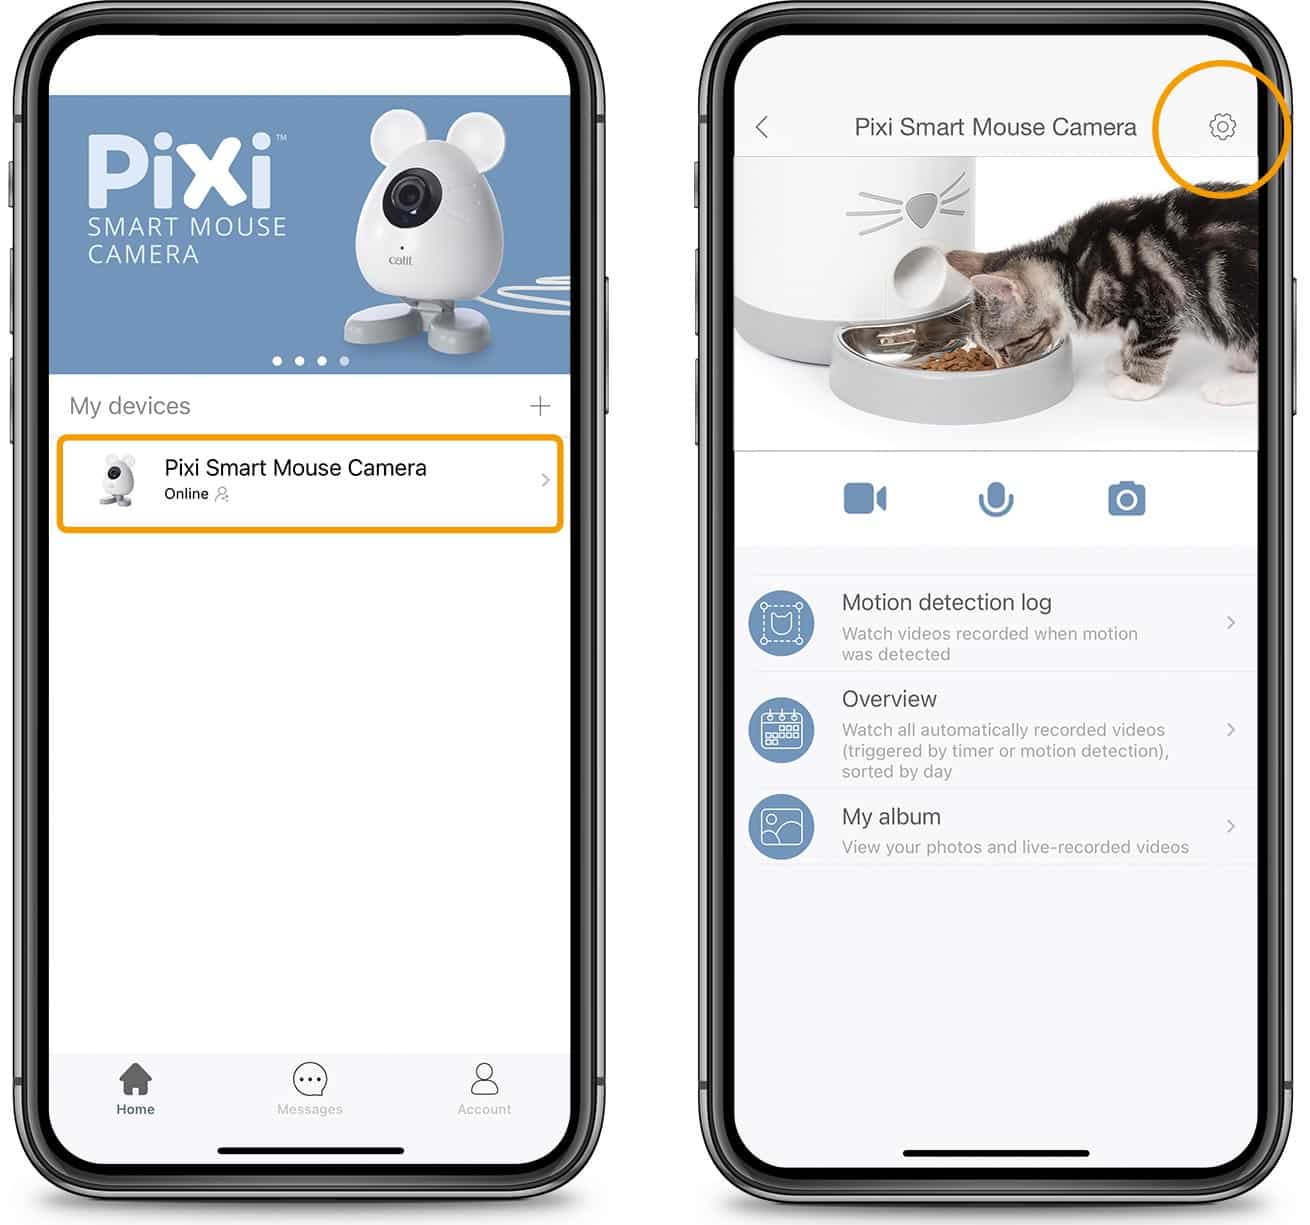
To enable motion detection, go to Motion detection settings and switch the motion detection toggle on.
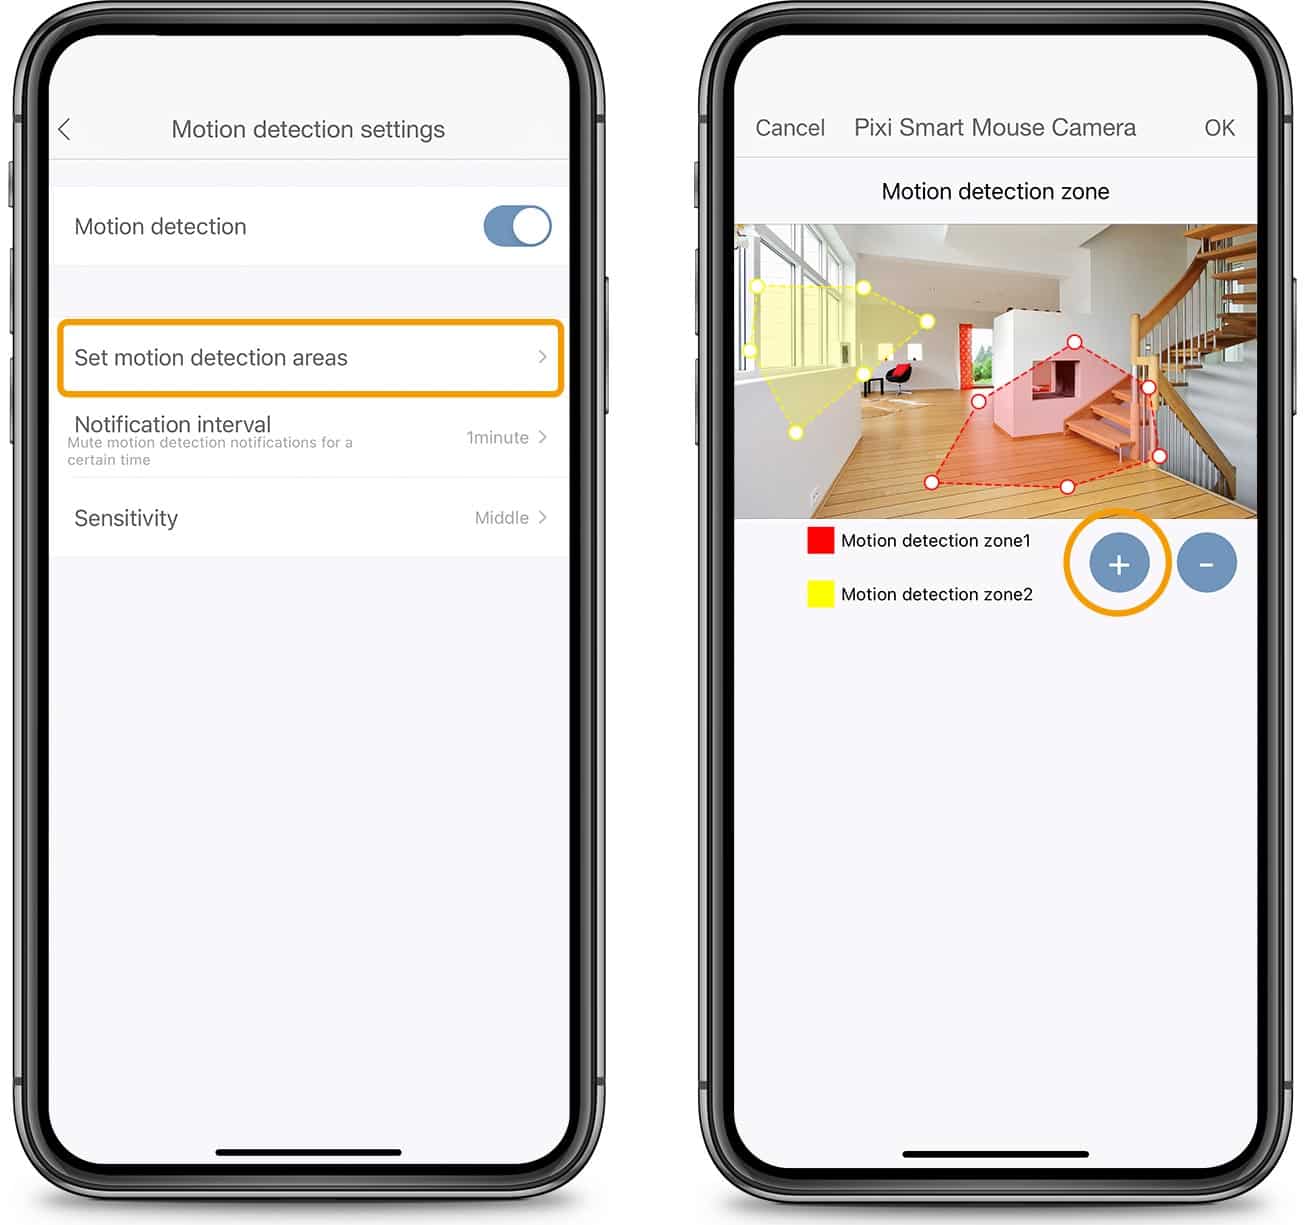
Set motion detection areas:
In the app’s Motion detection settings, you’ll have the option to set motion detection areas for selective monitoring such as by your cat’s feeder or drinking fountain. Tap the + button to add a motion detection zone. Tap and drag the little dots to select the area in the camera’s field of view that you wish to monitor. You can set up to two different motion detection areas within the camera’s field of view. Remove a motion detection zone by tapping the – button.
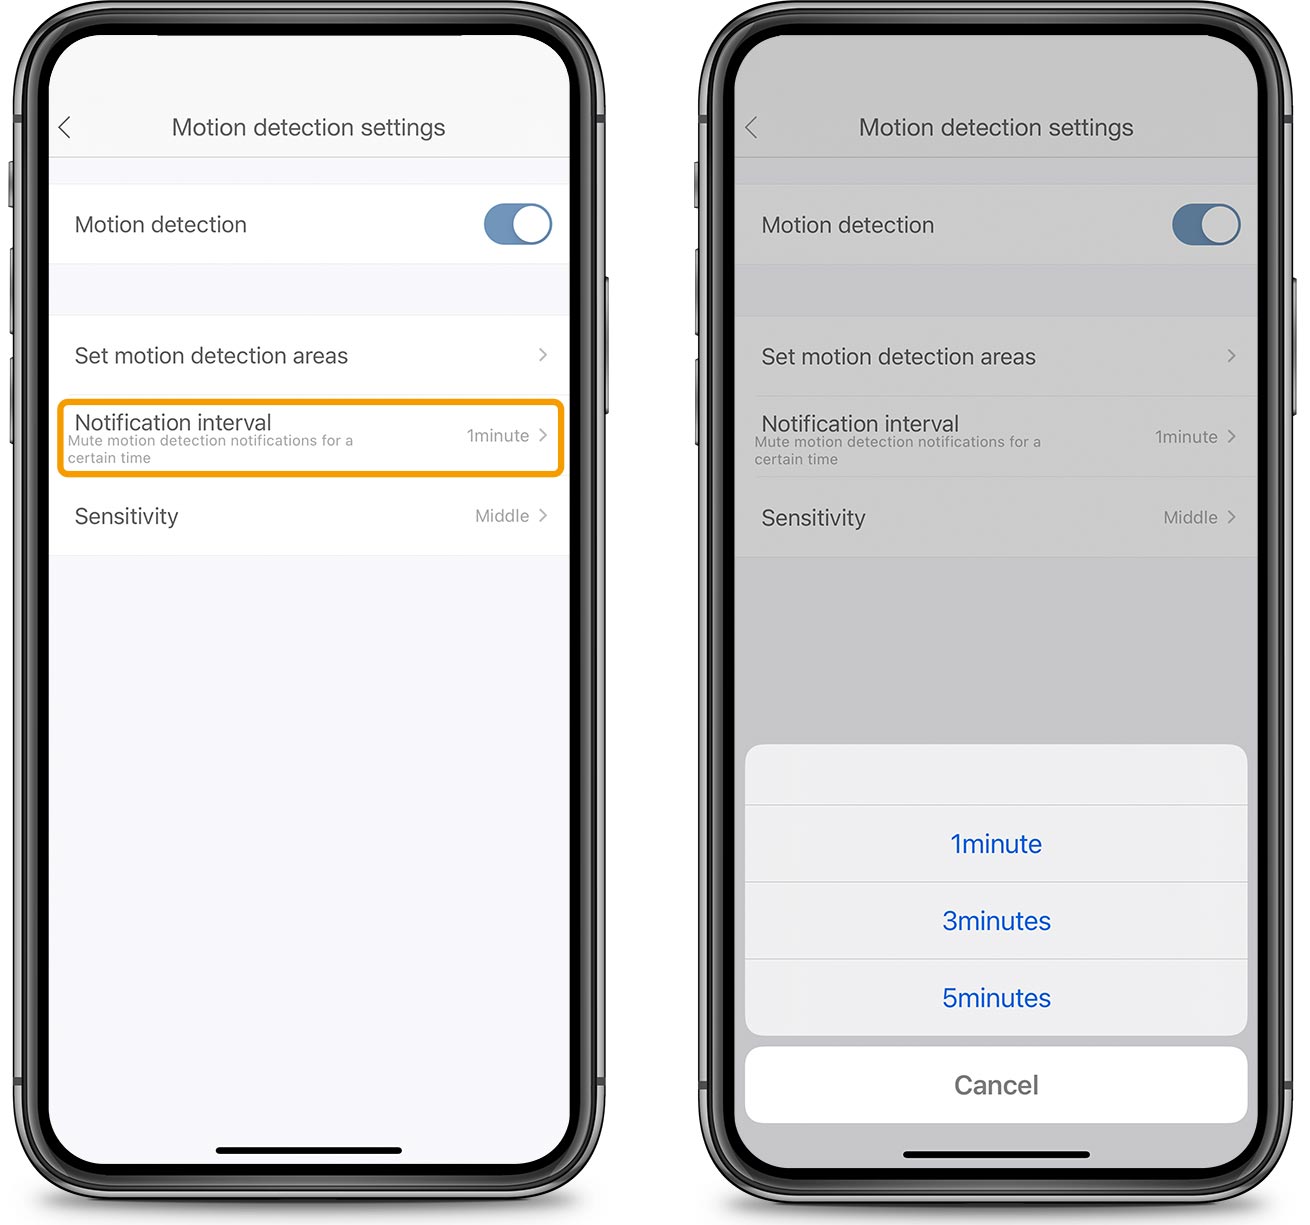
Set notification intervals:
You may not want to receive a notification every single time the camera picks up on motion (either in general or within your set motion detection areas). Setting a notification interval allows a pause of 1, 3 or 5 minutes between notifications. See our article on Notifications for more information on how to customise the settings.
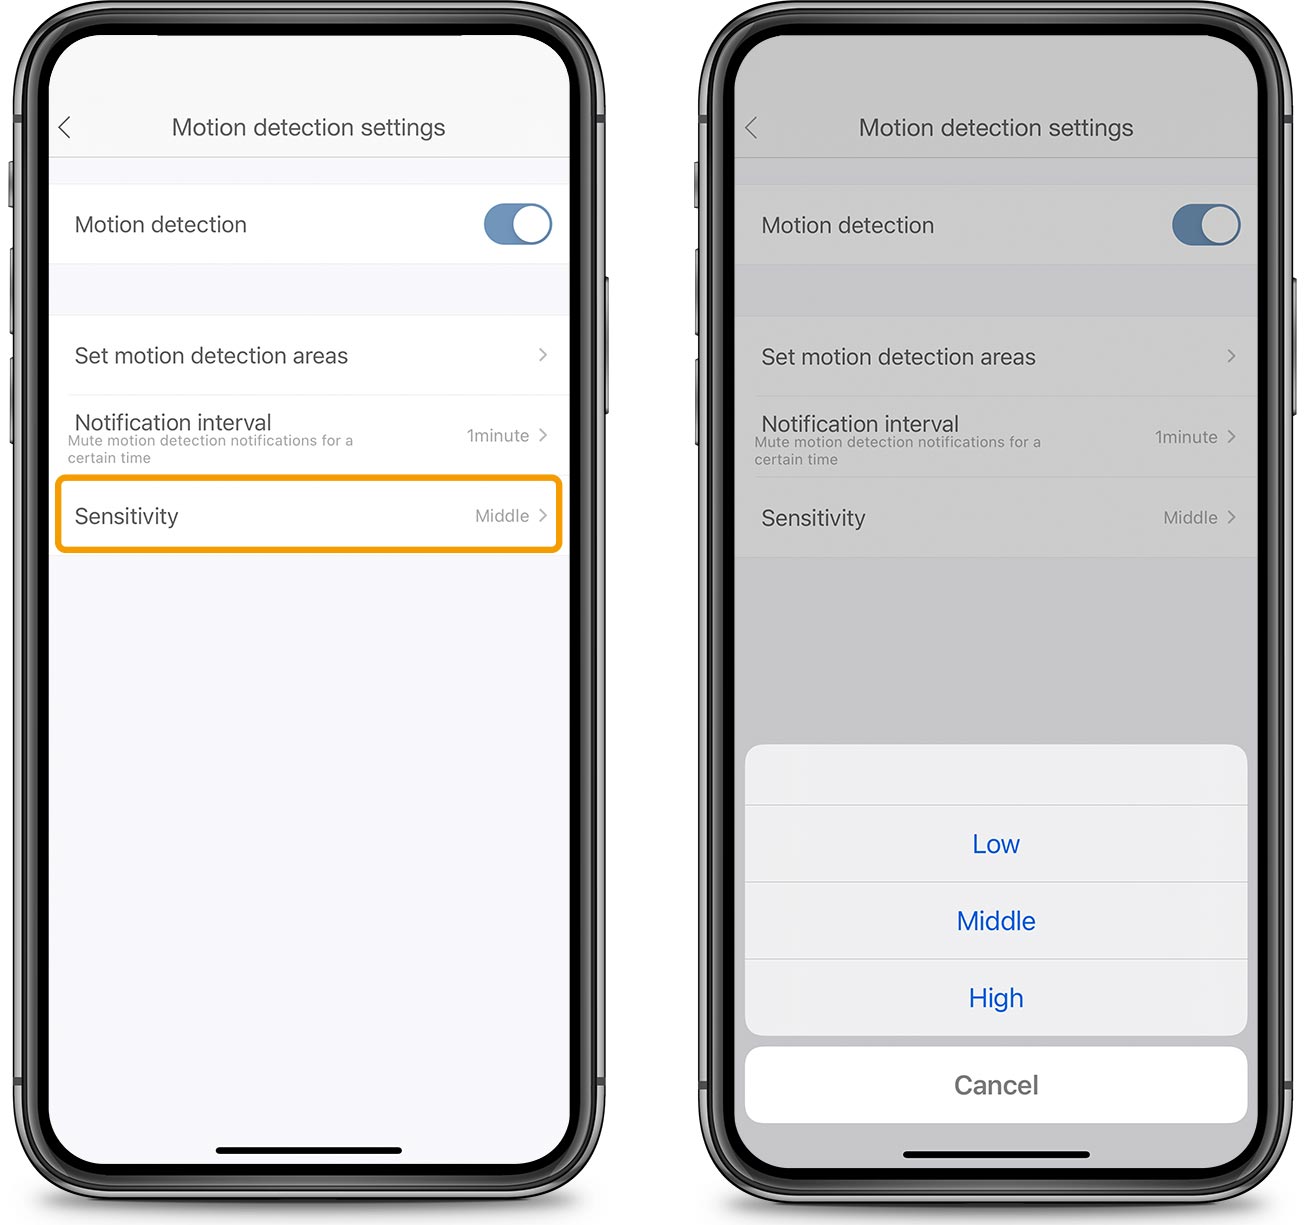
Adjusting sensitivity:
The Catit PIXI Smart Mouse Camera can be set to 3 levels of sensitivity in the Motion detection settings. It’s recommended to start at the ‘High’ setting and work your way down to ‘Medium’ or ‘Low’ only when you find that motion detection notifications or recordings are triggered too easily, such as by moving shadows instead of your cat actually walking past.
Motion detection log:
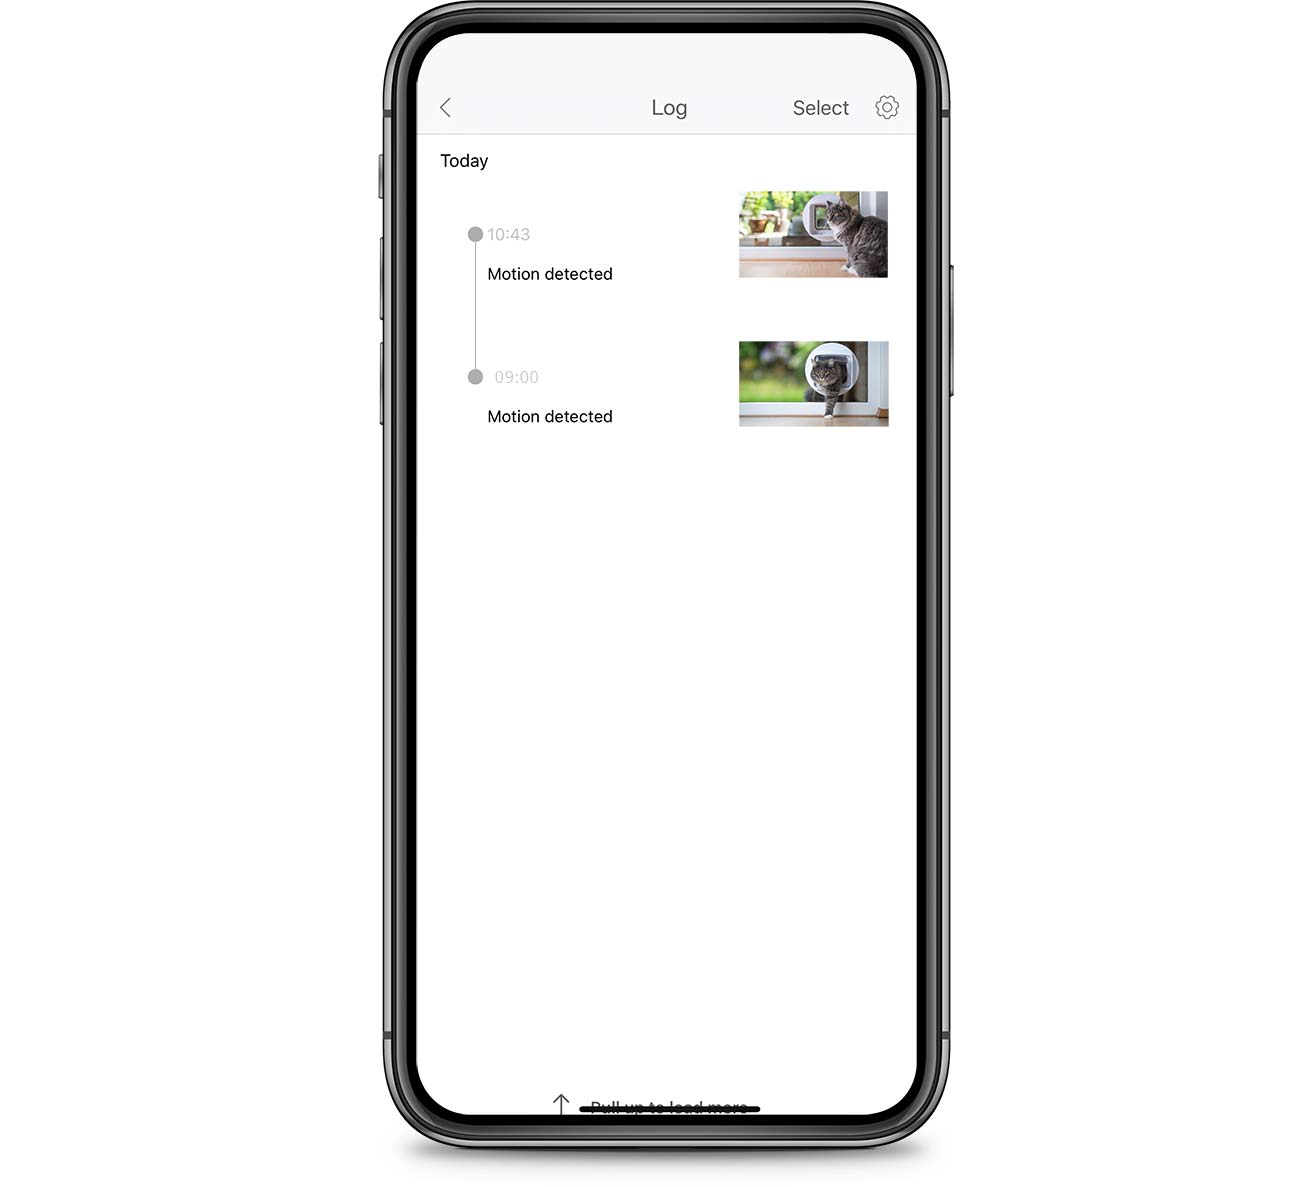
The app’s Motion detection log allows you to easily keep track of when the Catit PIXI Smart Mouse Camera has picked up on movement over time. All occurrences are listed in a chronological overview in the Motion detection log, along with a photo or short video clip (note: video is only enabled when you’ve inserted a MicroSD card into the camera).
9. Automatic recordings
The Catit PIXI Smart Mouse Camera can be set to record video footage or take photographs automatically, for you to watch later. Recording automatically is only possible with MicroSD card inserted (256 GB max., not included with the camera).
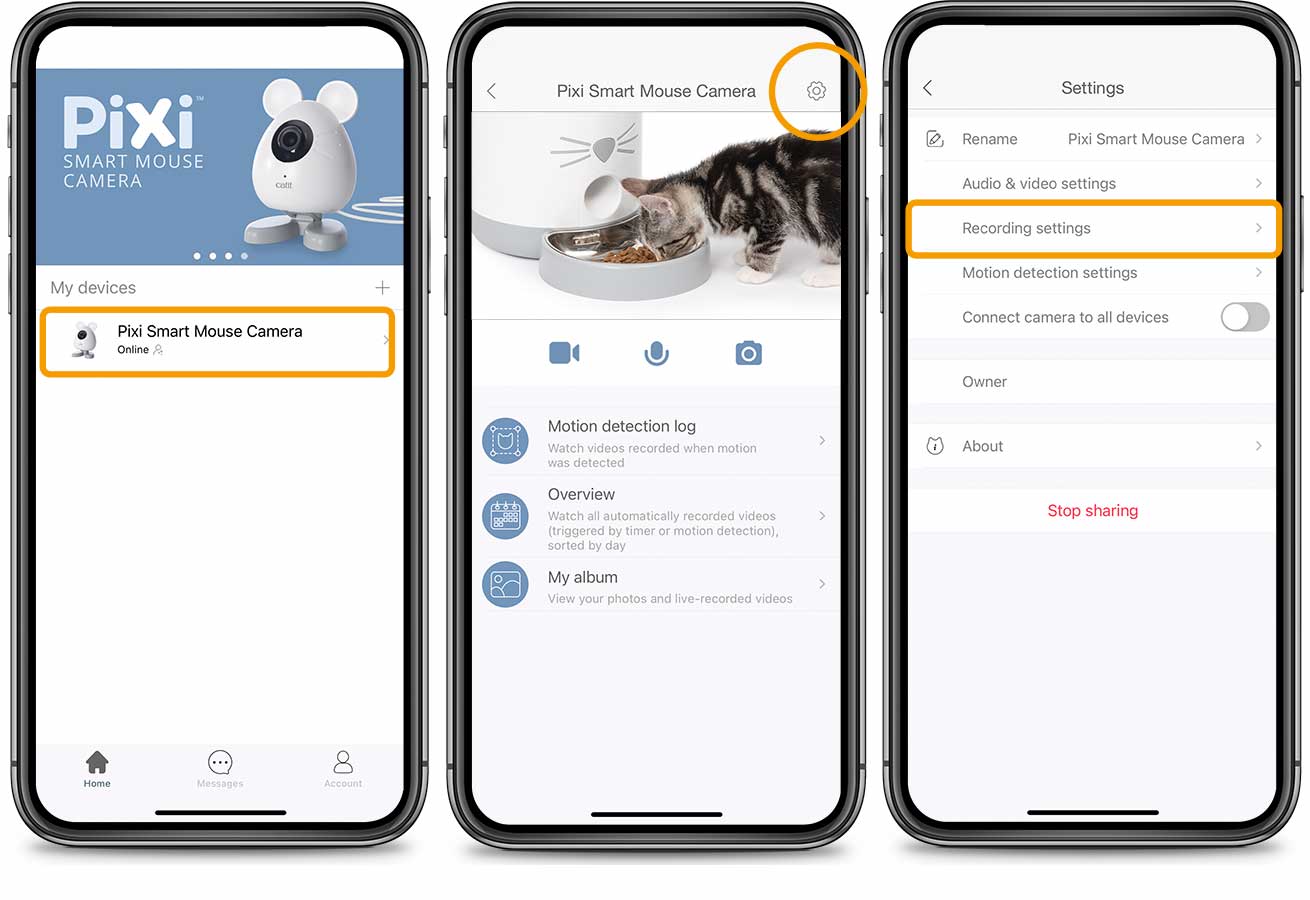
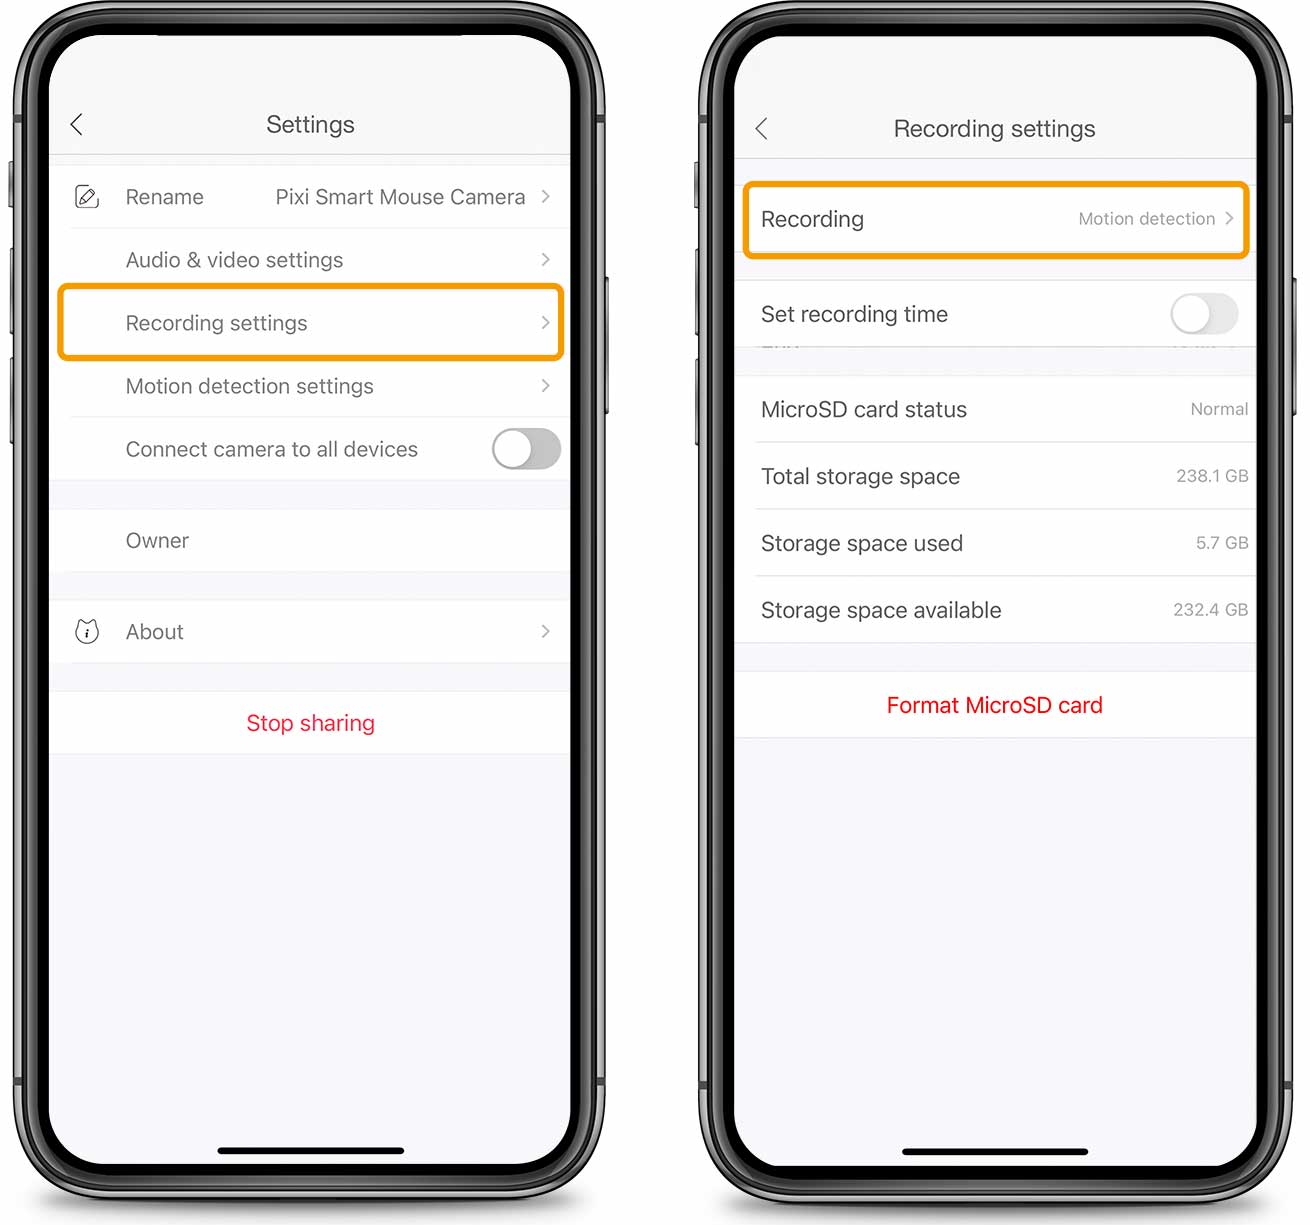
To select your preferred mode of automatic recording, open the camera’s Settings menu and tap on ‘Recording Settings’. The Recording feature at the top presents two options – Continuous or Motion detection.

9a. Continuous recordings
Selecting ‘continuous’ in the Recording Settings will have the Catit PIXI Smart Mouse Camera record continuously in sets of 24-hour videos. The complete recording is stored away in the app’s Overview menu for you to watch again later.
(Note: Using this feature requires you to insert a MicroSD card into the camera.)

9b. Automatic recordings by motion detection
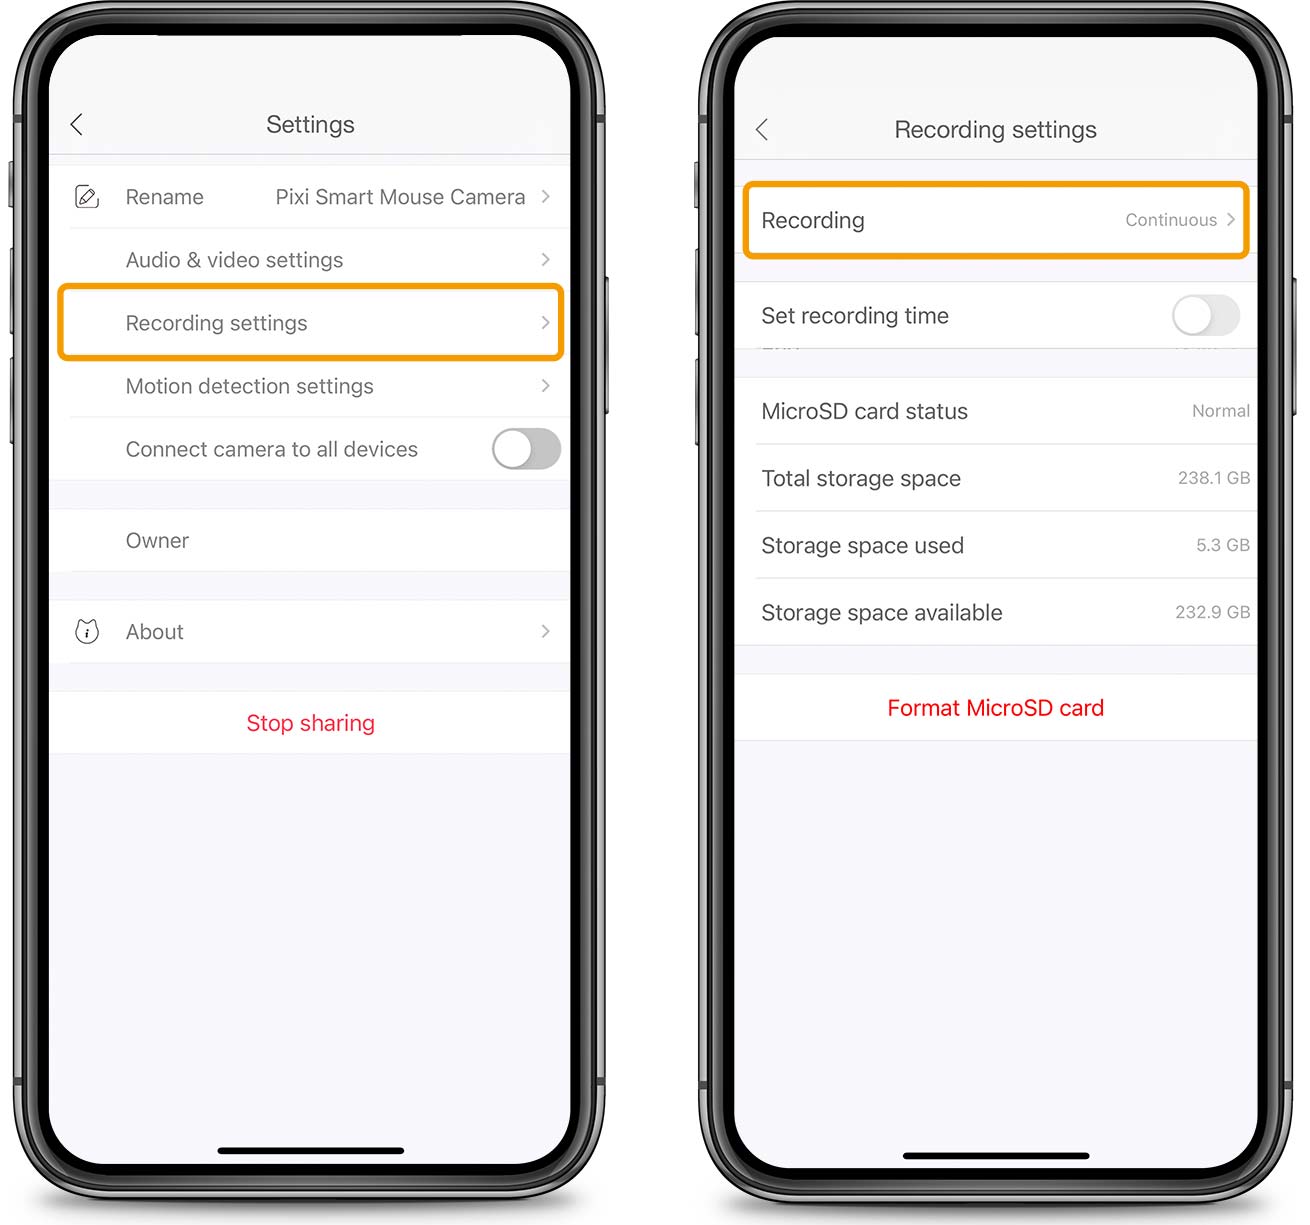
To enable automatic recordings by motion detection, two requirements need to be met: a MicroSD card must be inserted in the camera, and Motion Detection must be enabled in the Motion Detection Settings menu.
With the MicroSD card inserted, ensure to set the camera to record by motion detection, go to ‘Recording settings’ and select motion detection. The recorded videos are stored in the app’s Motion detection log and Overview.


9c. Set timer
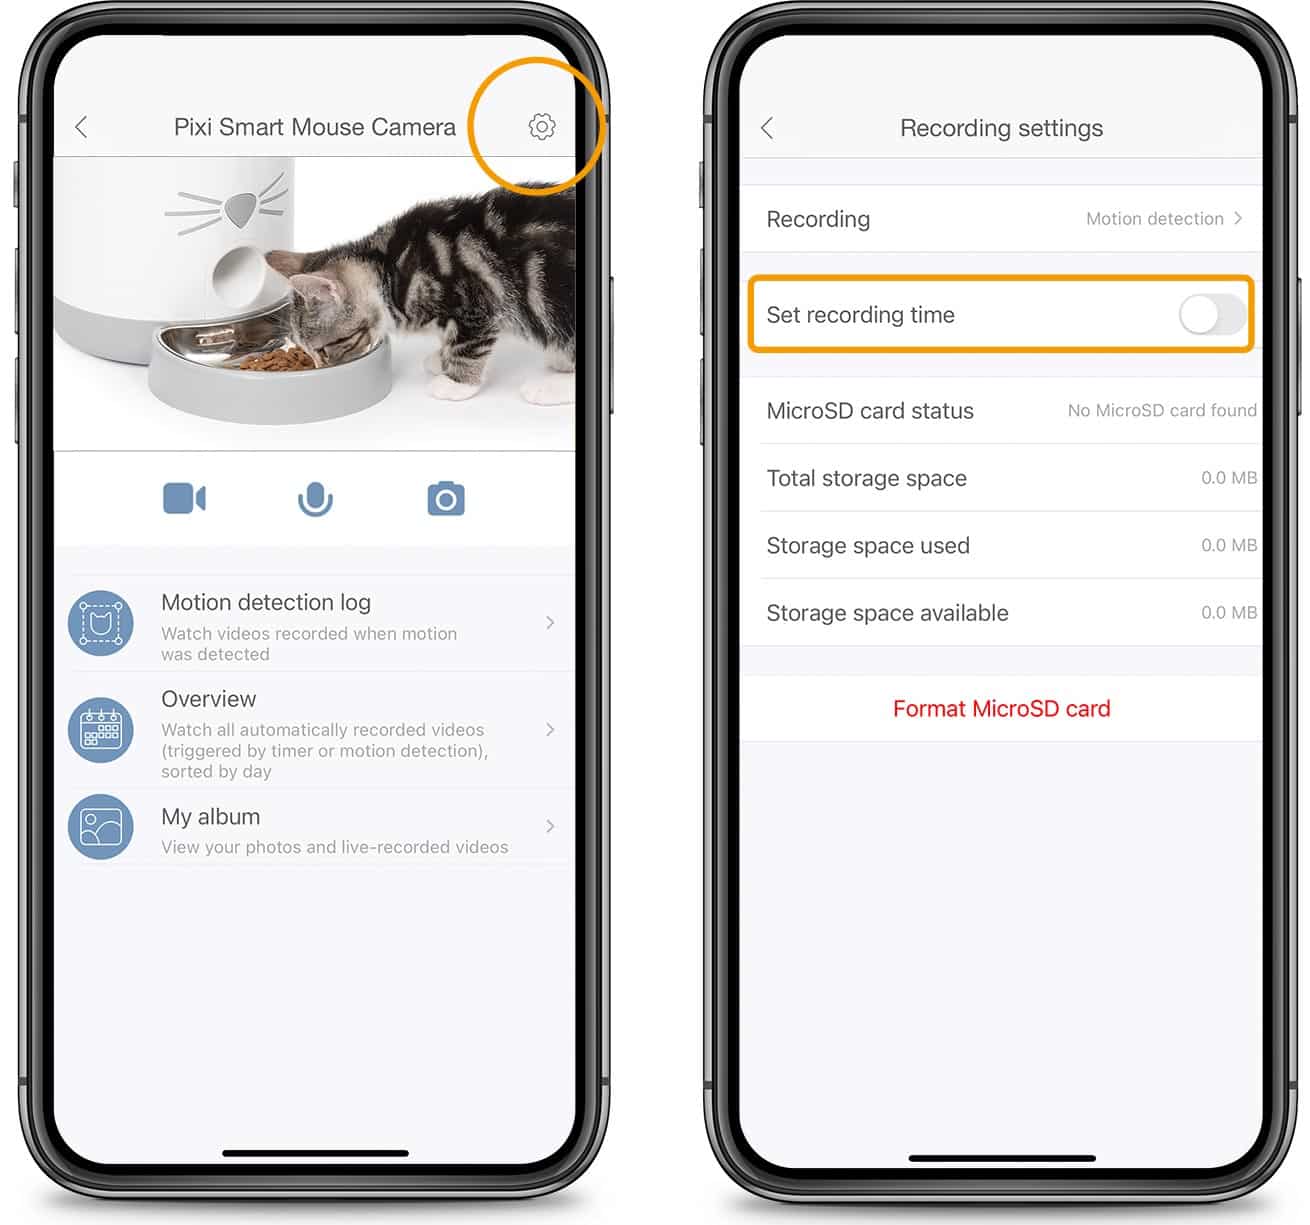
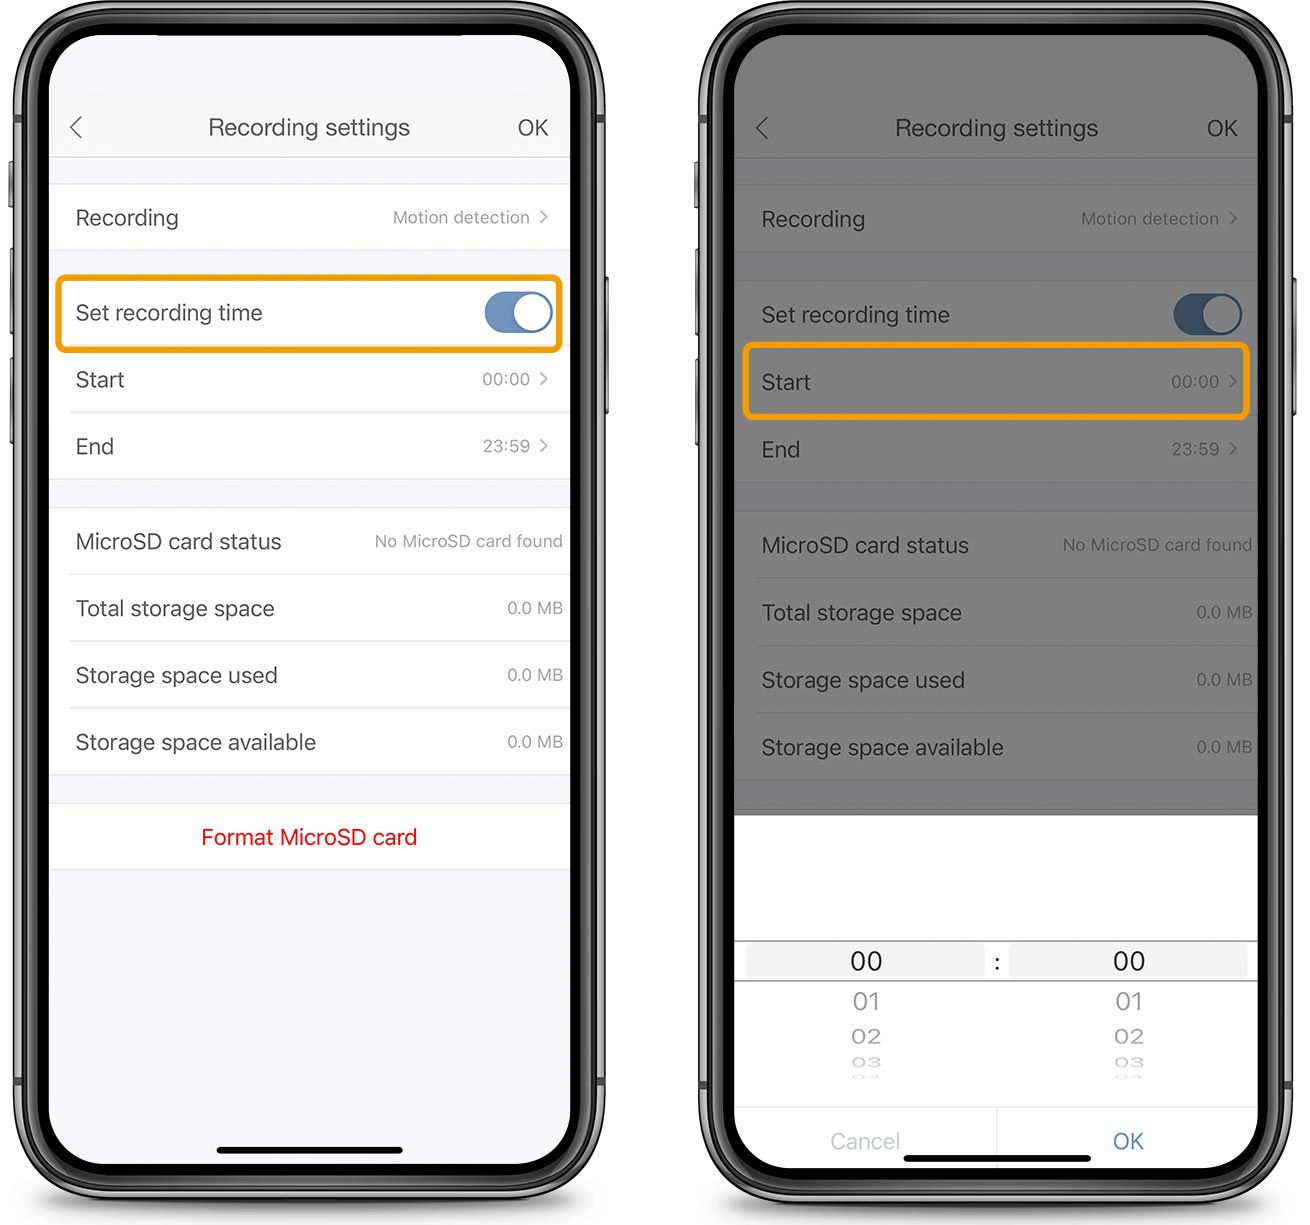
If you wish for the camera to automatically record only during a specific timeframe, tap on ‘Set Recording Time’ and set the start and end time of your preference. This allows you to record either continuously, or by motion detection, for a certain amount of time.
10. Overview
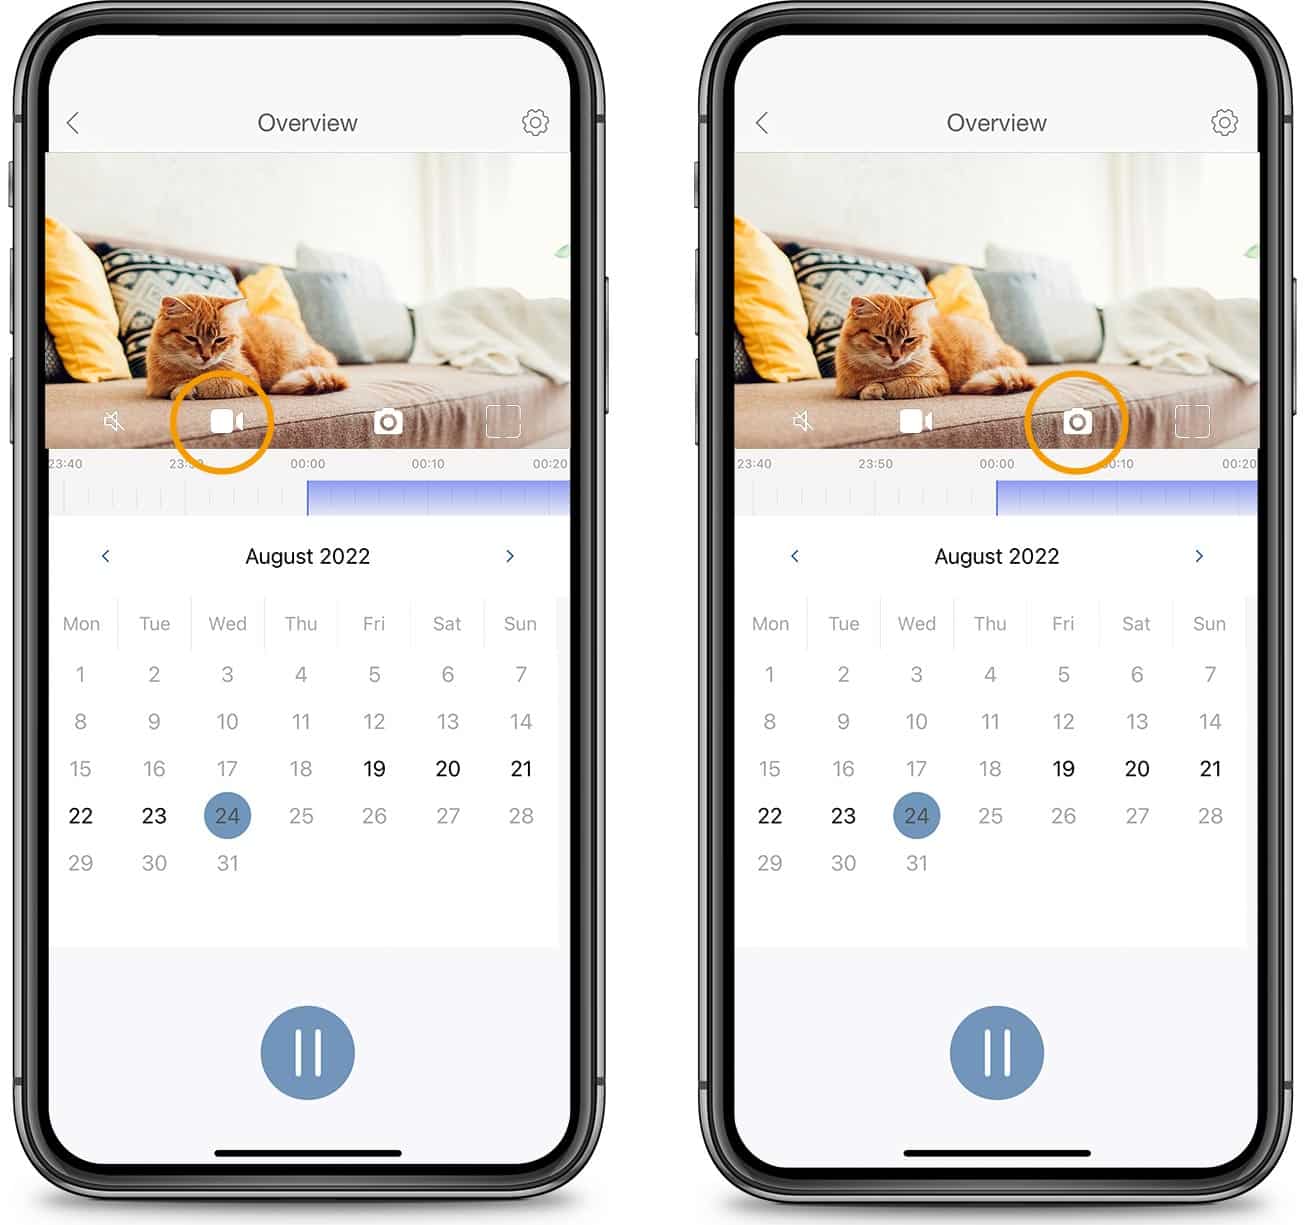
In the app’s Overview screen, you can watch all automatically recorded videos of your cat, conveniently sorted by day. As you watch the prerecorded video footage, you can take cute screenshots by tapping on the camera icon, and even shorter video clips by tapping on record. They’ll be saved to the My Album app feature and to your smartphone’s camera roll.
To skip through a video as you watch it, tap and drag your finger across the purple timeline. Move your finger left to skip ahead, and right to go back.
11. Night vision
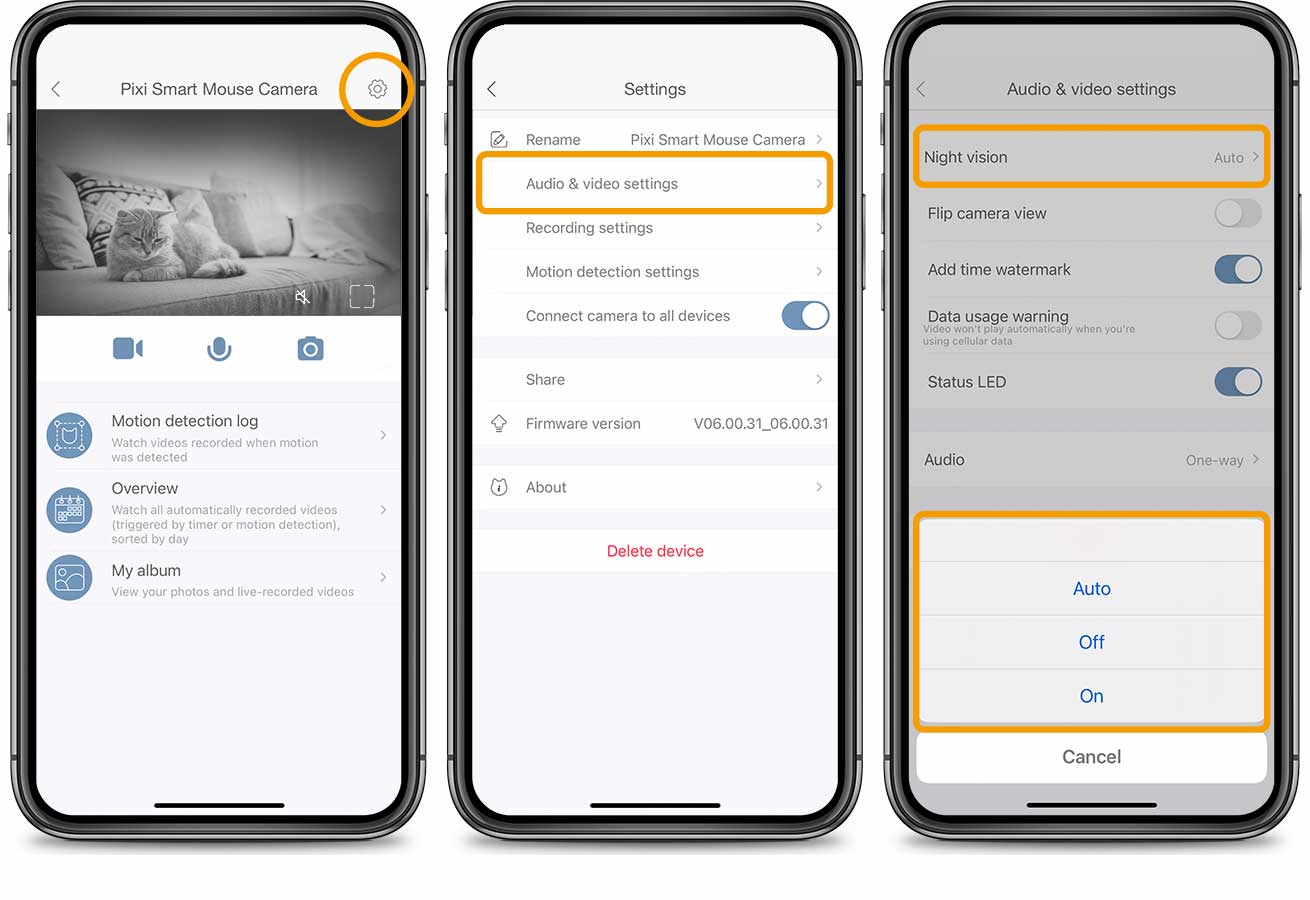
By default, the Catit PIXI Smart Mouse Camera will automatically switch to night vision in low light conditions, as to keep producing a clear image. This automatic switch to Night Vision can be disabled if so desired, from the ‘Audio & video settings’ menu, opting for ‘Night Vision – Off’.
12. Video Settings
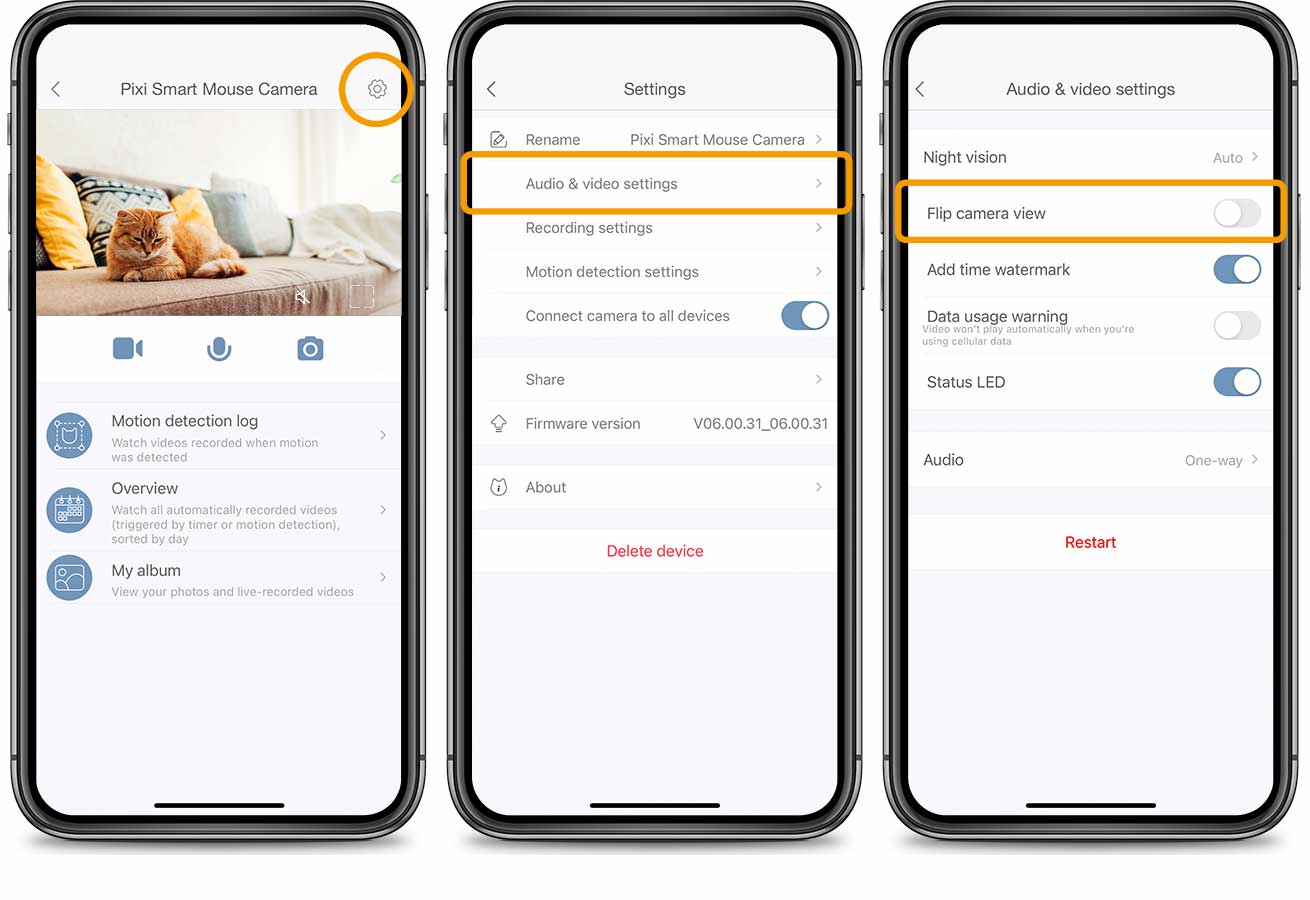
Flip camera view
Switch the Flip camera view toggle on to flip the camera’s video feed horizontally. Enabling this feature will also flip the image when recording video footage.
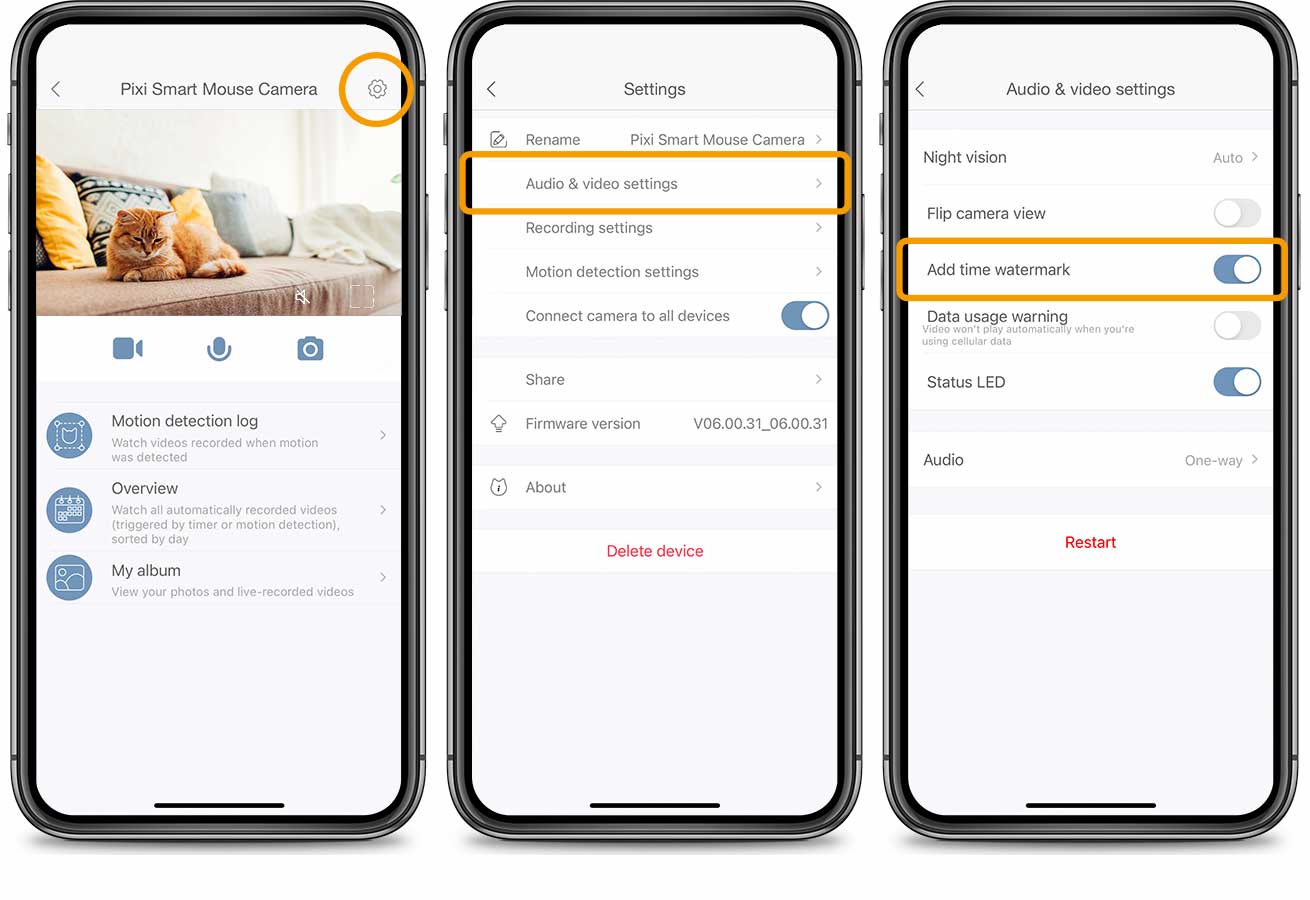
Add time watermark
Enable the time watermark feature to add a timestamp in the upper left corner of the camera’s video feed. The timestamp will be visible in every photo and video taken until the feature is disabled.
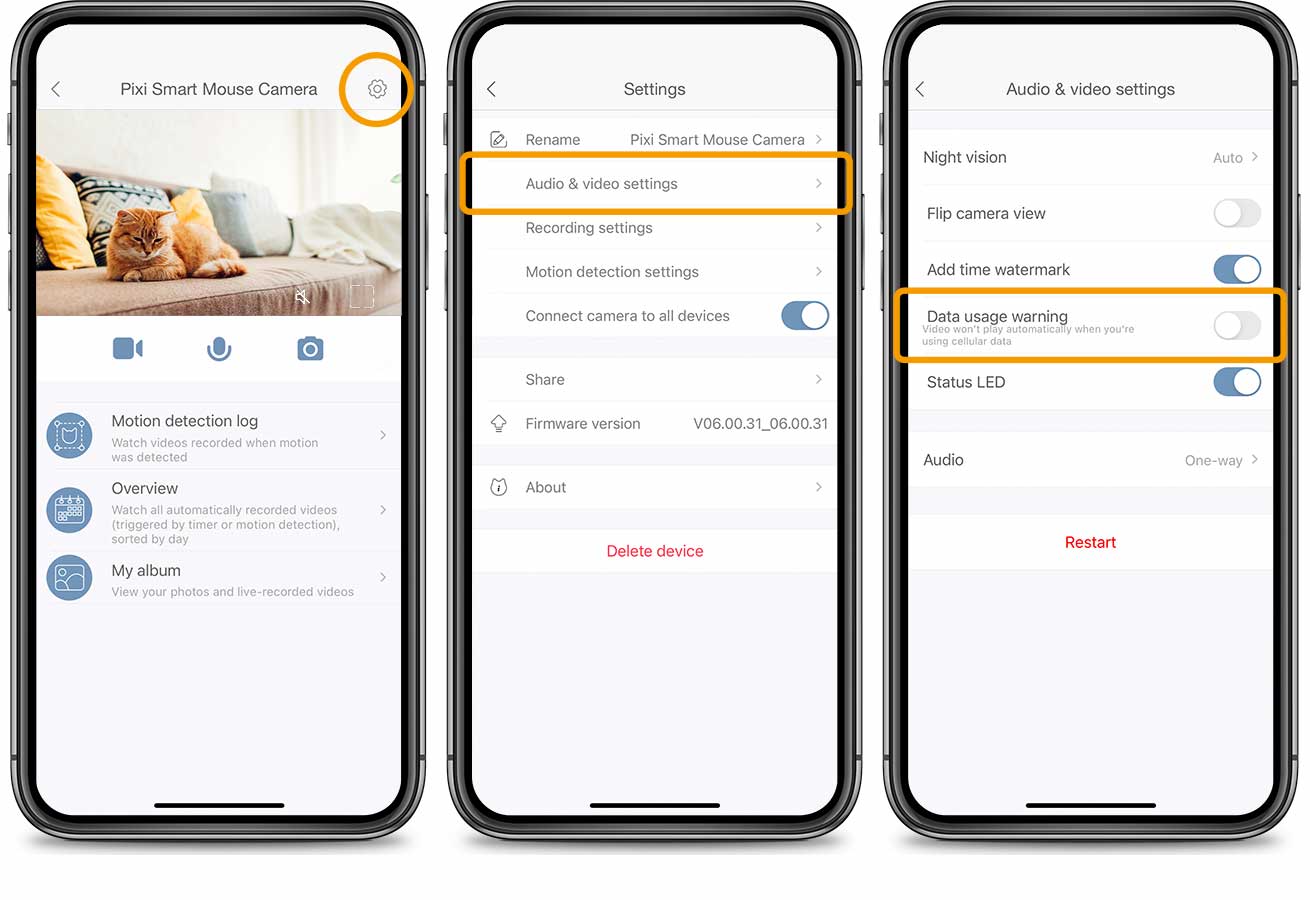
Data usage warning
Switch data usage warning on to keep the camera’s live video feed from playing automatically as you open the app while your smartphone does not have access to a Wi-Fi network. Instead, you will need to tap the play button in center of the image to start the live video feed. This will prevent your phone from using the mobile data required for streaming without your permission.
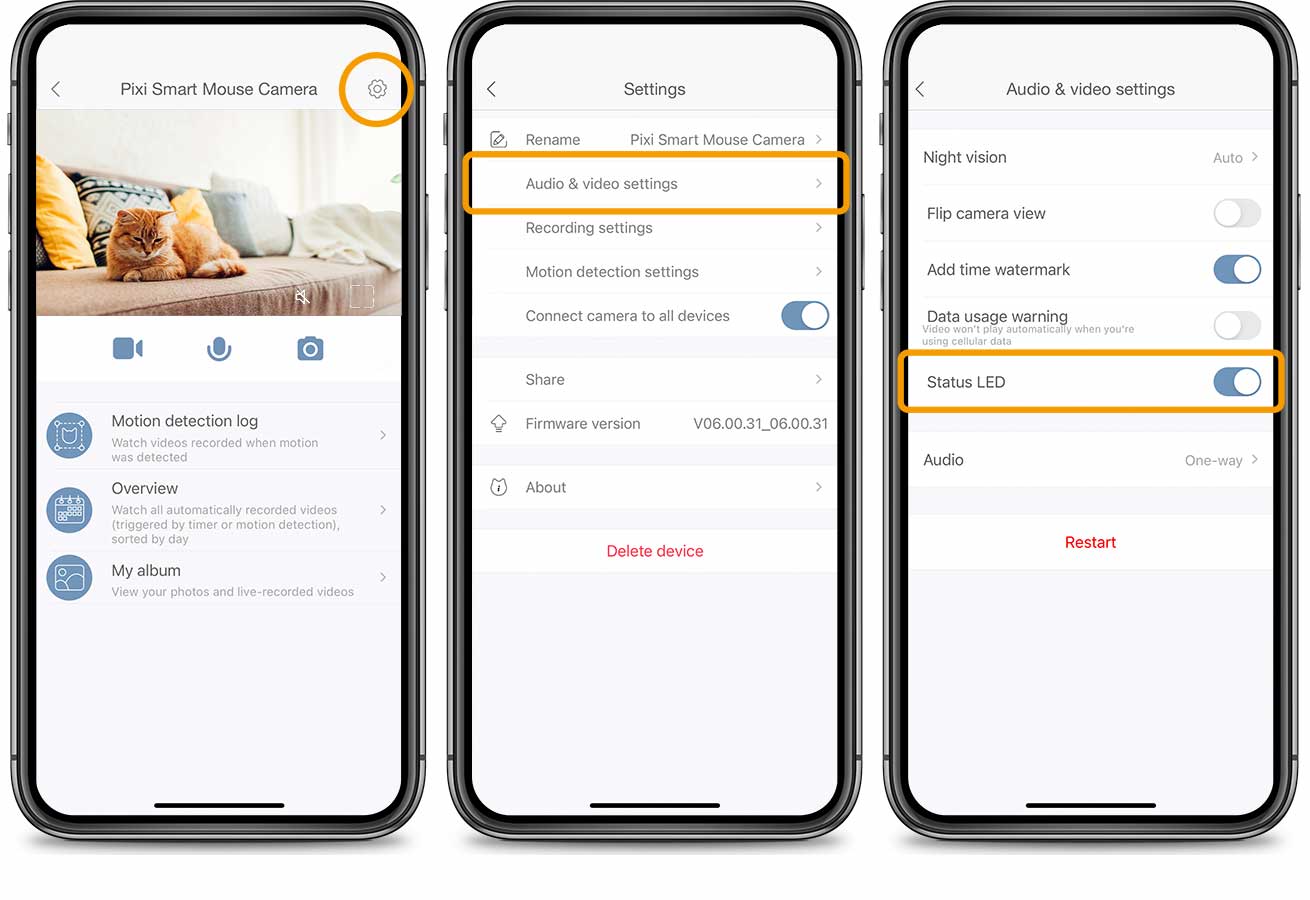
Status LED
The blue status LED light on the back of the Catit PIXI Smart Mouse Camera body can be turned off and on again using the Status LED slider in the app. Turning the LED light off can be convenient if your cat seems distracted by its glow in the dark.
13. Q&A
I don’t see any videos in the motion detection log, why is that?
Recording video footage by motion detection is only possible with MicroSD card inserted. See the MicroSD card segment for more information.
I don’t want to receive any Motion Detection notifications during the night.
Simply set a Do Not Disturb schedule in your Catit PIXI Account, as shown in our Catit PIXI app notifications guide.
My microSD card does not seem to be working.
This is easy to fix by formatting the MicroSD card as shown here. Make sure to save any important data currently stored to your MicroSD card before formatting, as it may be lost in the process.
